一、后端搭建
1、git 新建仓库
2、idea 新建项目

新建 pom.xml 文件
<?xml version="1.0" encoding="UTF-8"?>
<project xmlns="http://maven.apache.org/POM/4.0.0" xmlns:xsi="http://www.w3.org/2001/XMLSchema-instance"
         xsi:schemaLocation="http://maven.apache.org/POM/4.0.0 https://maven.apache.org/xsd/maven-4.0.0.xsd">
    <modelVersion>4.0.0</modelVersion>
    <groupId>com.atguigu.gulimall</groupId>
    <artifactId>gulimall</artifactId>
    <version>0.0.1-SNAPSHOT</version>
    <name>gulimall</name>
    <description>谷粒商城-聚合服务</description>
    <packaging>pom</packaging>

    <modules>
        <module>gulimall-order</module>
        <module>gulimall-ware</module>
        <module>gulimall-coupon</module>
        <module>gulimall-member</module>
        <module>gulimall-product</module>
        <module>renren-fast</module>
        <module>renren-generator</module>
    </modules>

</project>
3、配置 git 忽略文件
在主目录下的 .gitignore 添加忽略文件
**/mvnw
**/mvnw.cmd
**/HELP.md
**/.mvn
**/target/
.idea
**/.gitignore
4、导入 renren-fast、renren-generator
(1)用 git clone 拉取
(2)将拉取到的文件夹中的 .git 文件删除,然后复制到项目的跟目录下
(3)在主目录的 pom.xml 中添加模块 <module>renren-fast</module>
(4)在项目结构-模块中导入对应的模块,并设置 jdk 版本
(5)创建数据库,运行 renren-fast/db/mysql.sql 脚本文件
(6)修改 renren-fast 的配置文件的数据库配置
(7)如果是 renren-generator 还需要改 generator.properties ,修改模块路径
5、新增自定义模块
在主模块下新建模块,选择 springboot 版本,添加基本的 web、openfeign 依赖
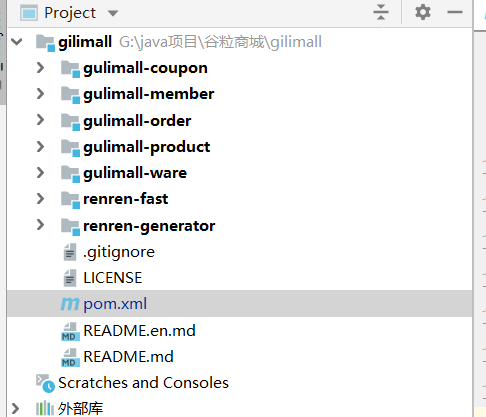
6、项目结构

二、自定义模块开发步骤
1、新建 common 公共模块
存放公共 依赖、工具类、bean
依赖:MyBatis-Plus、MySQL 等
2、代码生成
利用人人代码生成器生成代码,代码的生成模板可在以下路径中修改
\renren-generator\src\main\resources\template还需修改配置文件的数据源配置
还需修改以下文件中的 生成代码的包路径 和 模块名
\renren-generator\src\main\resources\generator.properties代码生成后,直接将 main 覆盖原模块的 main 文件夹即可
3、配置 MyBatis-Plus
(1)数据源 和 映射文件位置
server:
  port: 10000

spring:
  datasource:
    url: jdbc:mysql://localhost:3306/gulimall_pms?useUnicode=true&characterEncoding=UTF-8&serverTimezone=Asia/Shanghai
    driver-class-name: com.mysql.jdbc.Driver
    username: root
    password: 211964

mybatis-plus:
  mapper-locations: classpath:/mapper/**/*.xml
  global-config:
    db-config:
      id-type: auto        # 主键自增
      logic-delete-value: 1
      logic-not-delete-value: 0
二、renren-fast-vue 搭建
1、下载地址
https://gitee.com/renrenio/renren-fast-vue
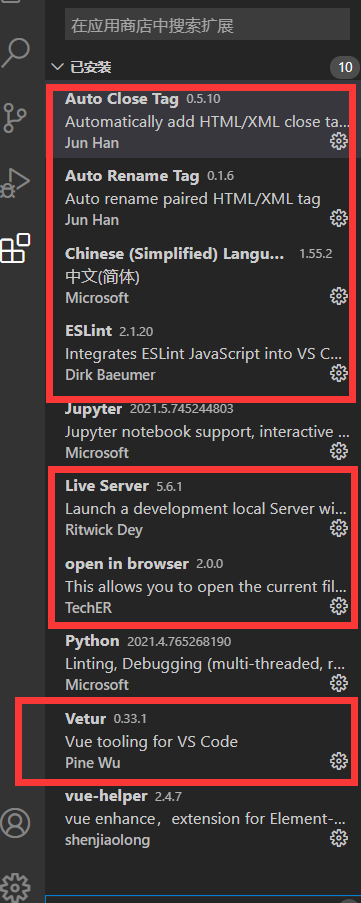
2、vs Code 安装插件

3、安装 Node.js
下载
https://nodejs.org/en/download/设置淘宝镜像源
npm config set registry http://registry.npm.taobao.org/查看 node 安装版本
node -v查看 镜像源
npm config ls4、项目依赖下载、运行
依赖下载
cnpm install项目运行
npm run dev项目停止
ctrl+c三、vue脚手架搭建
1、搭建
1、全局安装
如果以前安装过就不用了
npm install webpack -g
npm install -g vue-cli
2、 创建项目
vue init webpack demo(这个是项目名)如果出现以下错误,就换个网络试试
vue-cli · Failed to download repo vuejs-templates/webpack: read ECONNRESET如果成功,就会出现以下选项:
? Project name vuedemo02(项目名称)
? Project description A Vue.js project(描述,我默认了)
? Author simalinjia(作者名称)
? Vue build (Use arrow keys)(我默认了)
? Vue build standalone(我默认了)
? Install vue-router? Yes(路由,我yes)
? Use ESLint to lint your code? No
? Set up unit tests No
? Setup e2e tests with Nightwatch? No
? Should we run `npm install` for you after the project has been created? (recommended) npm
   vue-cli · Generated "vuedemo02"
3、依赖下载
cnpm install4、启动项目
npm run devvue项目目录结构:
| 目录/文件 | 说明 |
|---|---|
| build | 项目构建(webpack)相关代码 |
| config | 配置目录,包括端口号等。我们初学可以使用默认的 |
| node_modules | npm 加载的项目依赖模块 |
| src | 这里是我们要开发的目录,基本上要做的事情都在这个目录里。里面包含了几个目录及文件: - assets: 放置一些图片,如logo等。 - components: 目录里面放了一个组件文件,可以不用。 - App.vue: 项目入口文件,我们也可以直接将组件写这里,而不使用 components 目录。 - main.js: 项目的核心文件。 |
| static | 静态资源目录,如图片、字体等。 |
| test | 初始测试目录,可删除 |
| .xxxx文件 | 这些是一些配置文件,包括语法配置,git配置等。 |
| index.html | 首页入口文件,你可以添加一些 meta 信息或统计代码啥的。 |
| package.json | 项目配置文件。类似pom文件 |
2、引入 element-ui
1、安装
npm i element-ui -S2、在 main.js 添加
import ElementUI  from 'element-ui'
import 'element-ui/lib/theme-chalk/index.css';

// 让vue使用ElementUI组件
Vue.use(ElementUI);
3、之后就可以在 vue 文件中使用了
四、SpringCloud 搭建
1、依赖
<dependencyManagement>
    <dependencies>
        <dependency>
            <groupId>org.springframework.cloud</groupId>
            <artifactId>spring-cloud-dependencies</artifactId>
            <version>Greenwich.SR6</version>
            <type>pom</type>
            <scope>import</scope>
        </dependency>
        <dependency>
            <groupId>com.alibaba.cloud</groupId>
            <artifactId>spring-cloud-alibaba-dependencies</artifactId>
            <version>2.1.0.RELEASE</version>
            <type>pom</type>
            <scope>import</scope>
        </dependency>
        <dependency>
            <groupId>org.springframework.boot</groupId>
            <artifactId>spring-boot-dependencies</artifactId>
            <version>2.1.18.RELEASE</version>
            <type>pom</type>
            <scope>import</scope>
        </dependency>
    </dependencies>
</dependencyManagement>
