一、文档
Spirng-Cloud-alibaba
https://github.com/alibaba/spring-cloud-alibaba/blob/master/README-zh.md
SpringBoot整合OSS
上传方式
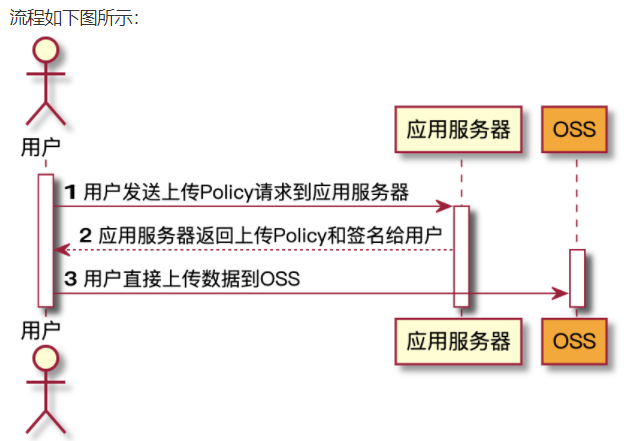
本文采用 服务端签名后直传 的方式上传图片。
本示例中,Web端向服务端请求签名,然后直接上传,不会对服务端产生压力,而且安全可靠。
https://help.aliyun.com/document_detail/31926.html?spm=a2c4g.11186623.6.1739.7cf1f2eeERxV3C

二、后端
1、依赖
<!--阿里云第三方服务-->
<dependency>
    <groupId>com.alibaba.cloud</groupId>
    <artifactId>aliyun-oss-spring-boot-starter</artifactId>
    <version>RELEASE</version>
</dependency>
2、application.yml
alibaba:
  cloud:
    access-key: ******
    secret-key: ******
    oss:
      endpoint: ******
      bucket: ******
3、接口
@RestController
@RequestMapping("/thirdparty")
public class OssController {

    @Resource
    OSS ossClient;

    @Value("${alibaba.cloud.oss.endpoint}")
    private String endpoint;
    @Value("${alibaba.cloud.oss.bucket}")
    private String bucket;

    @Value("${alibaba.cloud.access-key}")
    private String accessId;


    @RequestMapping("/oss/policy")
    public R policy() {

        //https://gulimall-hello.oss-cn-beijing.aliyuncs.com/hahaha.jpg
        // + "." + endpoint
        String host = "https://" + bucket; // host的格式为 bucketname.endpoint
        // callbackUrl为 上传回调服务器的URL,请将下面的IP和Port配置为您自己的真实信息。
        // String callbackUrl = "http://88.88.88.88:8888";
        String format = new SimpleDateFormat("yyyy-MM-dd").format(new Date());
        String dir = format + "/"; // 用户上传文件时指定的前缀。

        Map<String, String> respMap = null;
        try {
            long expireTime = 30;
            long expireEndTime = System.currentTimeMillis() + expireTime * 1000;
            Date expiration = new Date(expireEndTime);
            PolicyConditions policyConds = new PolicyConditions();
            policyConds.addConditionItem(PolicyConditions.COND_CONTENT_LENGTH_RANGE, 0, 1048576000);
            policyConds.addConditionItem(MatchMode.StartWith, PolicyConditions.COND_KEY, dir);

            String postPolicy = ossClient.generatePostPolicy(expiration, policyConds);
            byte[] binaryData = postPolicy.getBytes("utf-8");
            String encodedPolicy = BinaryUtil.toBase64String(binaryData);
            String postSignature = ossClient.calculatePostSignature(postPolicy);

            respMap = new LinkedHashMap<String, String>();
            respMap.put("accessid", accessId);
            respMap.put("policy", encodedPolicy);
            respMap.put("signature", postSignature);
            respMap.put("dir", dir);
            respMap.put("host", host);
            respMap.put("expire", String.valueOf(expireEndTime / 1000));
            // respMap.put("expire", formatISO8601Date(expiration));


        } catch (Exception e) {
            // Assert.fail(e.getMessage());
            System.out.println(e.getMessage());
        }

        return R.ok().put("data",respMap);
    }
}
三、前端
1、组件
将下面三个文件放到 upload 文件夹,并将 upload 文件夹放到 components 文件夹中
multiUpload.vue
![]()
singleUpload.vue
点击上传
只能上传jpg/png文件,且不超过10MB
![]()
policy.js
import http from '@/utils/httpRequest.js'
export function policy() {
   return  new Promise((resolve,reject)=>{
        http({
            // 修改上传的请求接口
            url: http.adornUrl("/thirdparty/oss/policy"),
            method: "get",
            params: http.adornParams({})
        }).then(({ data }) => {
            resolve(data);
        })
    });
}
2、引用组件
      <el-table-column
        header-align="center"
        align="center"
        label="品牌logo">
         <!--插入图片链接的代码-->
        <template slot-scope="scope">
          <div class="demo-image__preview">
          <el-image
            style="width: 100px; height: 100px"
            :src="scope.row.logo"
            :preview-src-list="[scope.row.logo]">
          </el-image>
          </div>
        </template>
      </el-table-column>
3、图片组件未注册问题
f12 报错
Unknown custom element: <el-image> - did you register the component correctl官方文档解决方式
https://element.eleme.cn/#/zh-CN/component/quickstart
解决方式1:完整引入
在 src/main.js 中加入以下代码
import ElementUI from 'element-ui'; //element-ui的全部组件
import 'element-ui/lib/theme-chalk/index.css'; //element-ui的css

Vue.use(ElementUI); //使用elementUI
解决方式2:按需引入(推荐)
详细的组件列表见上面的官方文档
import Vue from 'vue';
import { Image } from 'element-ui';

Vue.use(Image);
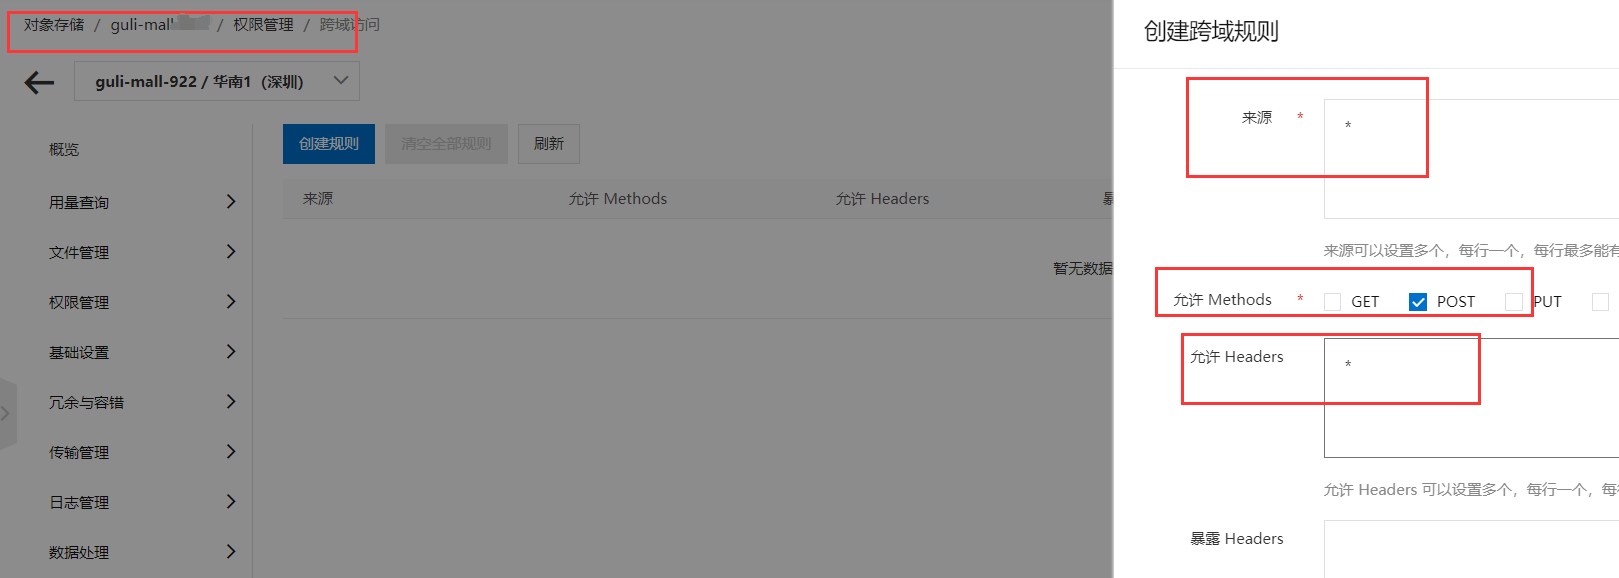
三、阿里云设置允许跨域


