1、md5加密
(1)md5.js
md5.js文件:
地址:https://pan.baidu.com/s/1zrGdHRSZeDL8W77xmb_ZUQ
提取码:lq2s
(2)引入和使用
import md5 from '@/pages/myDispatch/map/md5.js'

var sig = md5("要加密的字符串");
2、保留2位小数
方法一、会四舍五入
var num =2.446242342;
num = num.toFixed(2); // 输出结果为 2.45

var num =2.4;
num = num.toFixed(2); // 输出结果为 2.40
方法二、不会四舍五入
Math.floor(15.7784514000 * 100) / 100
// 输出结果为 15.77
3、JSON数据转化
JSON.parse(STRING) => OBJECT

JSON.stringify(OBJECT) => STRING
4、字符串转数字
字符串 * 1 即可转为数字类型
5、图片压缩
/**
  * 图片压缩,默认同比例压缩
  * @param {Object} fileObj
  * 图片对象
  * 回调函数有一个参数,base64的字符串数据
  */
export function compress(fileObj, callback) {
  try {
    // 文件大于 1 M就进行压缩
    if (fileObj.size <= (1 * 1024 * 1024)) {
      if (callback) {
        callback(fileObj);
      }
      return;
    }
    const reader = new FileReader()
    const image = new Image()
    image.onload = (imageEvent) => {
      const that = this
      // 默认按比例压缩
      let width = image.width
      let height = image.height
      const scale = width / height
      //设置画布最大宽度
      width = fileObj.width || width
      height = fileObj.height || (width / scale)
      if(width > 800){
        width = 800;
        height = Math.floor(width/scale);
      }
      const canvas = document.createElement('canvas');
      const context = canvas.getContext('2d');
      // 创建属性节点
      const anw = document.createAttribute('width')
      anw.nodeValue = width
      const anh = document.createAttribute('height')
      anh.nodeValue = height
      canvas.setAttributeNode(anw)
      canvas.setAttributeNode(anh)
      context.clearRect(0, 0, width, height);
      context.drawImage(image, 0, 0, width, height);
      // 画布转为 base64
      const dataUrl = canvas.toDataURL(fileObj.type, 0.7);
      const miniFile = dataURItoBlob(dataUrl, fileObj.name);
      //const blobData = dataURItoBlob(dataUrl, fileObj.type);
        //var miniFile = new File([blobData],fileObj.name,{type: fileObj.type});
      callback(miniFile)
    }
    reader.onload = (e => { image.src = e.target.result; });
    reader.readAsDataURL(fileObj);
  } catch (e) {
    console.log(e)
  }
}

/**
 * base64 转为二进制文件
 * @param dataURI
 * @param type
 */
function dataURItoBlob(dataURI, type) {
  var binary = atob(dataURI.split(',')[1]);
  var array = [];
  for(var i = 0; i < binary.length; i++) {
    array.push(binary.charCodeAt(i));
  }
  return new Blob([new Uint8Array(array)], {type: type});
}

/**
 * base64 转为 file
 * @param dataurl
 * @param filename
 */
function dataURLtoFile(dataurl, filename) {
  var arr = dataurl.split(','), mime = arr[0].match(/:(.*?);/)[1],
    bstr = atob(arr[1]), n = bstr.length, u8arr = new Uint8Array(n);
  while(n--){
    u8arr[n] = bstr.charCodeAt(n);
  }
  return new File([u8arr], filename, {type:mime});
}

/**
* 使用
*/
//compress(file,(miniFile)=>{
//    resolve(miniFile);
//})
6、导出
方法一
this.$http({
    url: this.$http.adornUrl('/demo/demo/export'),
    method: 'get',
    responseType: 'blob',
    params: this.$http.adornParams(this.dataForm)
}).then(res => {
    // 处理文档流
    const blob = new Blob([res.data])
    const elink = document.createElement('a')
    elink.download = 'demo.xlsx'
    elink.style.display = 'none'
    elink.href = URL.createObjectURL(blob)
    document.body.appendChild(elink)
    elink.click()
    // 释放URL 对象
    URL.revokeObjectURL(elink.href)
    document.body.removeChild(elink)
}).catch(() => {
    this.$message.error('下载失败')
})
方法二
let token = '&token=' + this.$cookie.get('token')
window.location.href = 'http://localhost:8080/demo/demo/export?' + qs.stringify(this.dataForm) + token
6、图片懒加载
1.懒加载原理
一张图片就是一个<img>标签,浏览器是否发起请求图片是根据<img>的src属性,所以实现懒加载的关键就是,在图片没有进入可视区域时,先不给<img>的src赋值,这样浏览器就不会发送请求了,等到图片进入可视区域再给src赋值。
2.懒加载思路及实现
实现懒加载有四个步骤,如下:
1.加载loading图片
2.判断哪些图片要加载【重点】
3.隐形加载图片
4.替换真图片
1.加载loading图片是在html部分就实现的,代码如下

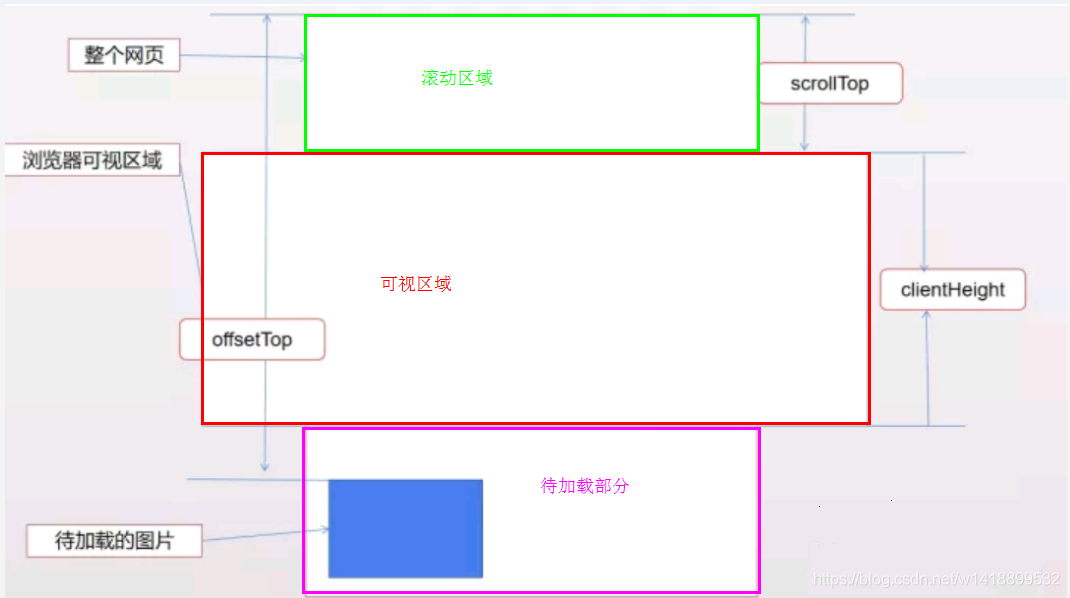
如何判断图片进入可视区域是关键。

如上图所示,让在浏览器可视区域的图片显示,可视区域外的不显示,所以当图片距离顶部的距离top-height等于可视区域h和滚动区域高度s之和时说明图片马上就要进入可视区了,就是说当top-height<=s+h时,图片在可视区。
这里介绍下几个API函数:
页可见区域宽: document.body.clientWidth;
网页可见区域高: document.body.clientHeight;
网页可见区域宽: document.body.offsetWidth (包括边线的宽);
网页可见区域高: document.body.offsetHeight (包括边线的宽);
网页正文全文宽: document.body.scrollWidth;
网页正文全文高: document.body.scrollHeight;
网页被卷去的高: document.body.scrollTop;
网页被卷去的左: document.body.scrollLeft;
网页正文部分上: window.screenTop;
网页正文部分左: window.screenLeft;
屏幕分辨率的高: window.screen.height;
屏幕分辨率的宽: window.screen.width;
屏幕可用工作区高度: window.screen.availHeight;
HTMLElement.offsetTop 为只读属性,它返回当前元素相对于其 offsetParent 元素的顶部的距离。
window.innerHeight:浏览器窗口的视口(viewport)高度(以像素为单位);如果有水平滚动条,也包括滚动条高度。
// onload是等所有的资源文件加载完毕以后再绑定事件
window.onload = function(){
    // 获取图片列表,即img标签列表
    var imgs = document.querySelectorAll('img');

    // 获取到浏览器顶部的距离
    function getTop(e){
        return e.offsetTop;
    }

    // 懒加载实现
    function lazyload(imgs){
        // 可视区域高度
        var h = window.innerHeight;
        //滚动区域高度
        var s = document.documentElement.scrollTop || document.body.scrollTop;
        for(var i=0;i<imgs.length;i++){
            //图片距离顶部的距离大于可视区域和滚动区域之和时懒加载
            if ((h+s)>getTop(imgs[i])) {
                // 真实情况是页面开始有2秒空白,所以使用setTimeout定时2s
                (function(i){
                    setTimeout(function(){
                        // 不加立即执行函数i会等于9
                        // 隐形加载图片或其他资源,
                        //创建一个临时图片,这个图片在内存中不会到页面上去。实现隐形加载
                        var temp = new Image();
                        temp.src = imgs[i].getAttribute('data-src');//只会请求一次
                        // onload判断图片加载完毕,真是图片加载完毕,再赋值给dom节点
                        temp.onload = function(){
                            // 获取自定义属性data-src,用真图片替换假图片
                            imgs[i].src = imgs[i].getAttribute('data-src')
                        }
                    },2000)
                })(i)
            }
        }
    }
    lazyload(imgs);

    // 滚屏函数
    window.onscroll =function(){
        lazyload(imgs);
    }
}
7、代码块
1. 对于单行代码, 使用标签 <code>代码</code> 。
2. 对于多行代码, 使用标签 <pre></pre> (被包围在 pre 元素中的文本通常会保留空格和换行符) 。
注释事项:将pre标签内部的的 ‘<’ 字符转义为 ‘& lt;’ 以保证代码里的关闭代码不被浏览器解释为标签。(删除&和l之间的空格!!!!)
<pre class="preCode">
<div class="easyui-dialog" style="width:400px;height:200px"
data-options="title:'My Dialog',iconCls:'icon-ok',onOpen:function(){}">
dialog content.
</div>
</pre>
