一、粘包、半包
1、基本介绍
TCP是面向连接的,面向流的,提供高可靠性服务。收发两端(客户端和服务器端)都要有一一成对的socket,因此,发送端为了将多个发给接收端的包,更有效的发给对方,使用了优化方法(Nagle算法),将多次间隔较小且数据量小的数据,合并成一个大的数据块,然后进行封包。这样做虽然提高了效率,但是接收端就难于分辨出完整的数据包了,因为面向流的通信是无消息保护边界的- 由于
TCP无消息保护边界,需要在接收端处理消息边界问题,也就是我们所说的粘包、半(拆)包问题
2、产生原因
粘包
- 现象,发送 abc 和 def,接收 abcdef
- 原因
- 应用层:接收方 ByteBuf 设置太大(Netty 默认 1024)
- 滑动窗口(传输层 - 网络层):假设发送方 256 bytes 表示一个完整报文,但由于接收方处理不及时且窗口大小足够大,这 256 bytes 字节就会缓冲在接收方的滑动窗口中,当滑动窗口中缓冲了多个报文就会粘包
- Nagle 算法(传输层 - 网络层):会造成粘包
半包
- 现象,发送 abcdef,接收 abc和def
- 原因
- 应用层:接收方 ByteBuf 小于实际发送数据量
- 滑动窗口(传输层 - 网络层):假设接收方的窗口只剩了 128 bytes,发送方的报文大小是 256 bytes,这时放不下了,只能先发送前 128 bytes,等待 ack 后才能发送剩余部分,这就造成了半包
- MSS 限制(数据链路层):当发送的数据超过 MSS 限制后,会将数据切分发送,就会造成半包
本质是因为 TCP 是流式协议,消息无边界
同一个客户端连接多次数据发送使用的Bytebuf是同一个
(1)滑动窗口
TCP 以一个段(segment)为单位,每发送一个段就需要进行一次确认应答(ack)处理,但如果这么做,缺点是包的往返时间越长性能就越差
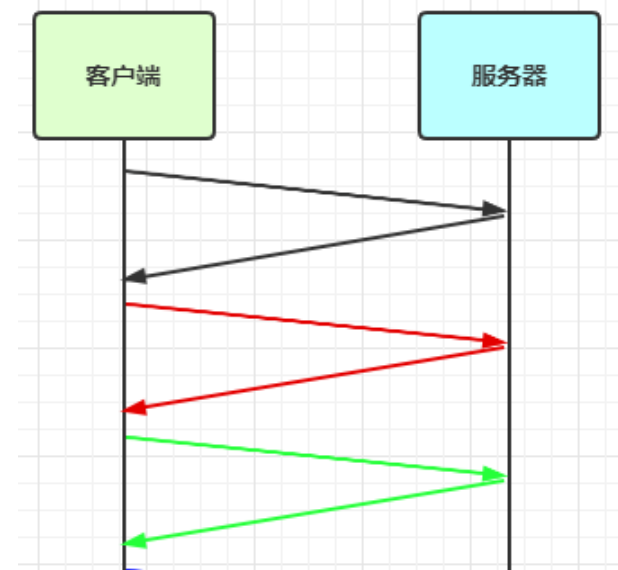
为了解决此问题,引入了窗口概念,窗口大小即决定了无需等待应答而可以继续发送的数据最大值
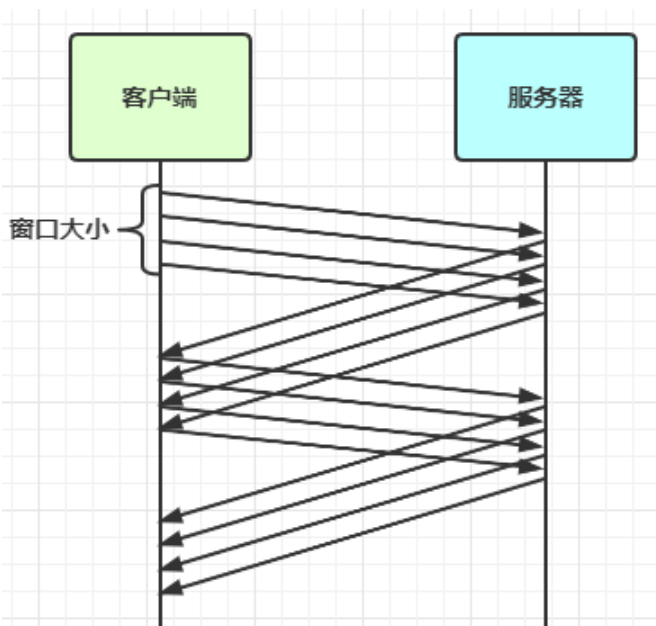
窗口实际就起到一个缓冲区的作用,同时也能起到流量控制的作用
- 图中深色的部分即要发送的数据,高亮的部分即窗口
- 窗口内的数据才允许被发送,当应答未到达前,窗口必须停止滑动
- 如果 1001~2000 这个段的数据 ack 回来了,窗口就可以向前滑动
- 接收方也会维护一个窗口,只有落在窗口内的数据才能允许接收
// 调整channel的容量
serverBootstrap.option(ChannelOption.SO_RCVBUF, 10);
注意
serverBootstrap.option(ChannelOption.SO_RCVBUF, 10) 影响的底层接收缓冲区(即滑动窗口)大小,仅决定了 netty 读取的最小单位,netty 实际每次读取的一般是它的整数倍
(2)MSS 限制
链路层对一次能够发送的最大数据有限制,这个限制称之为 MTU(maximum transmission unit),不同的链路设备的 MTU 值也有所不同,例如
以太网的 MTU 是 1500
FDDI(光纤分布式数据接口)的 MTU 是 4352
本地回环地址的 MTU 是 65535 - 本地测试不走网卡
MSS 是最大段长度(maximum segment size),它是 MTU 刨去 tcp 头和 ip 头后剩余能够作为数据传输的字节数
ipv4 tcp 头占用 20 bytes,ip 头占用 20 bytes,因此以太网 MSS 的值为 1500 - 40 = 1460
TCP 在传递大量数据时,会按照 MSS 大小将数据进行分割发送
MSS 的值在三次握手时通知对方自己 MSS 的值,然后在两者之间选择一个小值作为 MSS
(3)Nagle 算法
- 即使发送一个字节,也需要加入 tcp 头和 ip 头(40字节),也就是总字节数会使用 41 bytes,非常不经济。因此为了提高网络利用率,tcp 希望尽可能发送足够大的数据,这就是 Nagle 算法产生的缘由
- 该算法是指发送端即使还有应该发送的数据,但如果这部分数据很少的话,则进行延迟发送
- 如果 SO_SNDBUF 的数据达到 MSS,则需要发送
- 如果 SO_SNDBUF 中含有 FIN(表示需要连接关闭)这时将剩余数据发送,再关闭
- 如果 TCP_NODELAY = true,则需要发送
- 已发送的数据都收到 ack 时,则需要发送
- 上述条件不满足,但发生超时(一般为 200ms)则需要发送
- 除上述情况,延迟发送
3、解决方案
提供4种解决方案
- 短链接,发一个包建立一次连接,这样连接建立到连接断开之间就是消息的边界,缺点效率太低
- 每一条消息采用固定长度,缺点浪费空间
- 每一条消息采用分隔符,例如 \n,缺点需要转义
- 每一条消息分为 head 和 body,head 中包含 body 的长度
(1)短链接
客户端每次向服务器发送数据以后,就与服务器断开连接,此时的消息边界为连接建立到连接断开。这时便无需使用滑动窗口等技术来缓冲数据,则不会发生粘包现象。但如果一次性数据发送过多,接收方无法一次性容纳所有数据,还是会发生半包现象,所以短链接无法解决半包现象
客户端代码改进
修改channelActive方法
public void channelActive(ChannelHandlerContext ctx) throws Exception {
    log.debug("sending...");
    ByteBuf buffer = ctx.alloc().buffer(16);
    buffer.writeBytes(new byte[]{0, 1, 2, 3, 4, 5, 6, 7, 8, 9, 10, 11, 12, 13, 14, 15});
    ctx.writeAndFlush(buffer);
    // 使用短链接,每次发送完毕后就断开连接
    ctx.channel().close();
}
将发送步骤整体封装为send()方法,调用10次send()方法,模拟发送10次数据
public static void main(String[] args) {
    // 发送10次
    for (int i = 0; i < 10; i++) {
        send();
    }
}客户端先于服务器建立连接,此时控制台打印ACTIVE,之后客户端向服务器发送了16B的数据,发送后断开连接,此时控制台打印INACTIVE,可见未出现粘包现象
(2)定长解码器
客户端于服务器约定一个最大长度,保证客户端每次发送的数据长度都不会大于该长度。若发送数据长度不足则需要补齐至该长度
服务器接收数据时,将接收到的数据按照约定的最大长度进行拆分,即使发送过程中产生了粘包,也可以通过定长解码器将数据正确地进行拆分。服务端需要用到FixedLengthFrameDecoder对数据进行定长解码,具体使用方法如下
// 设置固定长度(一般为接收到数据的最大长度)
ch.pipeline().addLast(new FixedLengthFrameDecoder(16));缺点:浪费带宽,即使一次只发送一个字节,也需要补齐到指定的长度
客户端
// 约定最大长度为16
final int maxLength = 16;
// 被发送的数据
char c = 'a';
// 向服务器发送10个报文
for (int i = 0; i < 10; i++) {
    ByteBuf buffer = ctx.alloc().buffer(maxLength);
    // 定长byte数组,未使用部分会以0进行填充
    byte[] bytes = new byte[maxLength];
    // 生成长度为0~15的数据
    for (int j = 0; j < (int)(Math.random()*(maxLength-1)); j++) {
        bytes[j] = (byte) c;
    }
    buffer.writeBytes(bytes);
    c++;
    // 将数据发送给服务器
    ctx.writeAndFlush(buffer);
}
服务端
使用FixedLengthFrameDecoder对粘包数据进行拆分,该handler需要添加在LoggingHandler之前,保证数据被打印时已被拆分
// 通过定长解码器对粘包数据进行拆分
ch.pipeline().addLast(new FixedLengthFrameDecoder(16));
ch.pipeline().addLast(new LoggingHandler(LogLevel.DEBUG));
运行结果
8222 [nioEventLoopGroup-3-1] DEBUG io.netty.handler.logging.LoggingHandler  - [id: 0xbc122d07, L:/127.0.0.1:8080 - R:/127.0.0.1:52954] READ: 16B
         +-------------------------------------------------+
         |  0  1  2  3  4  5  6  7  8  9  a  b  c  d  e  f |
+--------+-------------------------------------------------+----------------+
|00000000| 61 61 61 61 00 00 00 00 00 00 00 00 00 00 00 00 |aaaa............|
+--------+-------------------------------------------------+----------------+

8222 [nioEventLoopGroup-3-1] DEBUG io.netty.handler.logging.LoggingHandler  - [id: 0xbc122d07, L:/127.0.0.1:8080 - R:/127.0.0.1:52954] READ: 16B
         +-------------------------------------------------+
         |  0  1  2  3  4  5  6  7  8  9  a  b  c  d  e  f |
+--------+-------------------------------------------------+----------------+
|00000000| 62 62 62 00 00 00 00 00 00 00 00 00 00 00 00 00 |bbb.............|
+--------+-------------------------------------------------+----------------+


8222 [nioEventLoopGroup-3-1] DEBUG io.netty.handler.logging.LoggingHandler  - [id: 0xbc122d07, L:/127.0.0.1:8080 - R:/127.0.0.1:52954] READ: 16B
         +-------------------------------------------------+
         |  0  1  2  3  4  5  6  7  8  9  a  b  c  d  e  f |
+--------+-------------------------------------------------+----------------+
|00000000| 63 63 00 00 00 00 00 00 00 00 00 00 00 00 00 00 |cc..............|
+--------+-------------------------------------------------+----------------+

...
(3)行解码器
行解码器的是通过分隔符对数据进行拆分来解决粘包半包问题的
通过
LineBasedFrameDecoder(int maxLength)来拆分以**换行符(\n或\r)**为分隔符的数据自定义分隔符通过
DelimiterBasedFrameDecoder(int maxFrameLength, ByteBuf... delimiters)来指定通过什么分隔符来拆分数据(可以传入多个分隔符)
两种解码器构造方法都需要传入数据的最大长度,若超出最大长度,会抛出TooLongFrameException异常
以换行符 \n 为分隔符
客户端代码
// 约定最大长度为 64
final int maxLength = 64;
// 被发送的数据
char c = 'a';
for (int i = 0; i < 10; i++) {
    ByteBuf buffer = ctx.alloc().buffer(maxLength);
    // 生成长度为0~62的数据
    Random random = new Random();
    StringBuilder sb = new StringBuilder();
    for (int j = 0; j < (int)(random.nextInt(maxLength-2)); j++) {
        sb.append(c);
    }
    // 数据以 \n 结尾
    sb.append("\n");
    buffer.writeBytes(sb.toString().getBytes(StandardCharsets.UTF_8));
    c++;
    // 将数据发送给服务器
    ctx.writeAndFlush(buffer);
}
服务器代码
// 通过行解码器对粘包数据进行拆分,以 \n 为分隔符
// 需要指定最大长度
ch.pipeline().addLast(new DelimiterBasedFrameDecoder(64));
ch.pipeline().addLast(new LoggingHandler(LogLevel.DEBUG));
自定义分隔符
// 将分隔符放入ByteBuf中
ByteBuf bufSet = ch.alloc().buffer().writeBytes("\\c".getBytes(StandardCharsets.UTF_8));
// 通过行解码器对粘包数据进行拆分,以 \c 为分隔符
ch.pipeline().addLast(new DelimiterBasedFrameDecoder(64, ch.alloc().buffer().writeBytes(bufSet)));
ch.pipeline().addLast(new LoggingHandler(LogLevel.DEBUG));
(4)长度字段解码器
在传送数据时可以在数据中添加一个用于表示有用数据长度的字段,在解码时读取出这个用于表明长度的字段,同时读取其他相关参数,即可知道最终需要的数据是什么样子的
LengthFieldBasedFrameDecoder解码器可以提供更为丰富的拆分方法,其构造方法有五个参数
public LengthFieldBasedFrameDecoder(
    int maxFrameLength,
    int lengthFieldOffset, int lengthFieldLength,
    int lengthAdjustment, int initialBytesToStrip)
参数解析
maxFrameLength数据最大长度- 表示数据的最大长度(包括附加信息、长度标识等内容)
lengthFieldOffset数据长度标识的起始偏移量- 用于指明数据第几个字节开始是用于标识有用字节长度的,因为前面可能还有其他附加信息
lengthFieldLength数据长度标识所占字节数(用于指明有用数据的长度)- 数据中用于表示有用数据长度的标识所占的字节数
lengthAdjustment长度表示与有用数据的偏移量- 用于指明数据长度标识和有用数据之间的距离,因为两者之间还可能有附加信息
initialBytesToStrip数据读取起点- 读取起点,不读取 0 ~ initialBytesToStrip 之间的数据
图解

lengthFieldOffset   = 0
lengthFieldLength   = 2
lengthAdjustment    = 0
initialBytesToStrip = 0 (= do not strip header)

BEFORE DECODE (14 bytes)         AFTER DECODE (14 bytes)
+--------+----------------+      +--------+----------------+
| Length | Actual Content |----->| Length | Actual Content |
| 0x000C |  HELLO, WORLD  |      | 0x000C |  HELLO, WORLD  |
+--------+----------------+ +--------+----------------+从0开始即为长度标识,长度标识长度为2个字节0x000C
0x000C 即为后面 HELLO, WORLD的长度
lengthFieldOffset   = 0
lengthFieldLength   = 2
lengthAdjustment    = 0
initialBytesToStrip = 2 (= the length of the Length field)

BEFORE DECODE (14 bytes)         AFTER DECODE (12 bytes)
+--------+----------------+      +----------------+
| Length | Actual Content |----->| Actual Content |
| 0x000C | "HELLO, WORLD" |      | "HELLO, WORLD" |
+--------+----------------+ +----------------+从0开始即为长度标识,长度标识长度为2个字节,读取时从第二个字节开始读取(此处即跳过长度标识)
因为跳过了用于表示长度的2个字节,所以此处直接读取HELLO, WORLD
lengthFieldOffset   = 2 (= the length of Header 1)
lengthFieldLength   = 3
lengthAdjustment    = 0
initialBytesToStrip = 0

BEFORE DECODE (17 bytes)                      AFTER DECODE (17 bytes)
+----------+----------+----------------+      +----------+----------+----------------+
| Header 1 |  Length  | Actual Content |----->| Header 1 |  Length  | Actual Content |
|  0xCAFE  | 0x00000C | "HELLO, WORLD" |      |  0xCAFE  | 0x00000C | "HELLO, WORLD" |
+----------+----------+----------------+ +----------+----------+----------------+长度标识前面还有2个字节的其他内容(0xCAFE),第三个字节开始才是长度标识,长度表示长度为3个字节(0x00000C)
Header1中有附加信息,读取长度标识时需要跳过这些附加信息来获取长度
lengthFieldOffset   = 0
lengthFieldLength   = 3
lengthAdjustment    = 2 (= the length of Header 1)
initialBytesToStrip = 0

BEFORE DECODE (17 bytes)                      AFTER DECODE (17 bytes)
+----------+----------+----------------+      +----------+----------+----------------+
|  Length  | Header 1 | Actual Content |----->|  Length  | Header 1 | Actual Content |
| 0x00000C |  0xCAFE  | "HELLO, WORLD" |      | 0x00000C |  0xCAFE  | "HELLO, WORLD" |
+----------+----------+----------------+ +----------+----------+----------------+从0开始即为长度标识,长度标识长度为3个字节,长度标识之后还有2个字节的其他内容(0xCAFE)
长度标识(0x00000C)表示的是**从其后lengthAdjustment(2个字节)开始的数据的长度,即HELLO, WORLD**,不包括0xCAFE
lengthFieldOffset   = 1 (= the length of HDR1)
lengthFieldLength   = 2
lengthAdjustment    = 1 (= the length of HDR2)
initialBytesToStrip = 3 (= the length of HDR1 + LEN)

BEFORE DECODE (16 bytes)                       AFTER DECODE (13 bytes)
+------+--------+------+----------------+      +------+----------------+
| HDR1 | Length | HDR2 | Actual Content |----->| HDR2 | Actual Content |
| 0xCA | 0x000C | 0xFE | "HELLO, WORLD" |      | 0xFE | "HELLO, WORLD" |
+------+--------+------+----------------+ +------+----------------+长度标识前面有1个字节的其他内容,后面也有1个字节的其他内容,读取时从长度标识之后3个字节处开始读取,即读取 0xFE HELLO, WORLD
测试代码
通过 EmbeddedChannel 对 handler 进行测试
简单版
public class EncoderStudy {
    public static void main(String[] args) {
        // 模拟服务器
        // 使用EmbeddedChannel测试handler
        EmbeddedChannel channel = new EmbeddedChannel(
                // 数据最大长度为1KB,长度标识前后各有1个字节的附加信息,长度标识长度为4个字节(int)
                new LengthFieldBasedFrameDecoder(1024, 0, 4, 0, 4),
                new LoggingHandler(LogLevel.DEBUG)
        );

        // 模拟客户端,写入数据
        ByteBuf buffer = ByteBufAllocator.DEFAULT.buffer();
        send(buffer, "Hello");
        channel.writeInbound(buffer);
        send(buffer, "World");
        channel.writeInbound(buffer);
    }

    private static void send(ByteBuf buf, String msg) {
        // 得到数据的长度
        int length = msg.length();
        byte[] bytes = msg.getBytes(StandardCharsets.UTF_8);
        // 将数据信息写入buf
        // 写入数据长度标识
        buf.writeInt(length);
        // 写入具体的数据
        buf.writeBytes(bytes);
    }
}
携带版本号协议等内容
public class EncoderStudy {
    public static void main(String[] args) {
        // 模拟服务器
        // 使用EmbeddedChannel测试handler
        EmbeddedChannel channel = new EmbeddedChannel(
                // 数据最大长度为1KB,长度标识前后各有1个字节的附加信息,长度标识长度为4个字节(int)
                new LengthFieldBasedFrameDecoder(1024, 1, 4, 1, 4),
                new LoggingHandler(LogLevel.DEBUG)
        );

        // 模拟客户端,写入数据
        ByteBuf buffer = ByteBufAllocator.DEFAULT.buffer();
        send(buffer, "Hello");
        channel.writeInbound(buffer);
        send(buffer, "World");
        channel.writeInbound(buffer);
    }

    private static void send(ByteBuf buf, String msg) {
        // 得到数据的长度
        int length = msg.length();
        byte[] bytes = msg.getBytes(StandardCharsets.UTF_8);
        // 将数据信息写入buf
        // 写入长度标识前的其他信息
        buf.writeByte(0xCA);
        // 写入数据长度标识
        buf.writeInt(length);
        // 写入长度标识后的其他信息
        buf.writeByte(0xFE);
        // 写入具体的数据
        buf.writeBytes(bytes);
    }
}
二、协议涉及与解析
1、协议的作用
TCP/IP 中消息传输基于流的方式,没有边界
协议的目的就是划定消息的边界,制定通信双方要共同遵守的通信规则
2、常见协议实现
(1)Redis协议
如果我们要向Redis服务器发送一条set name zhangsan的指令,需要遵守如下协议
// 该指令一共有3部分,每条指令之后都要添加回车与换行符
*3\r\n
// 第一个指令的长度是3
$3\r\n
// 第一个指令是set指令
set\r\n
// 下面的指令以此类推
$4\r\n
name\r\n
$8\r\n
zhangsan\r\n
客户端代码
@Slf4j
public class TestRedis {
    /*
    set name zhangsan
    *3
    $3
    set
    $4
    name
    $8
    zhangsan
     */
    public static void main(String[] args) {
        // 回车和换行
        final byte[] LINE = {13, 10};
        //final byte[] LINE = {'\r','\n'};
        NioEventLoopGroup worker = new NioEventLoopGroup();
        try {
            Bootstrap bootstrap = new Bootstrap();
            bootstrap.channel(NioSocketChannel.class);
            bootstrap.group(worker);
            bootstrap.handler(new ChannelInitializer<SocketChannel>() {
                @Override
                protected void initChannel(SocketChannel ch) {
                    ch.pipeline().addLast(new LoggingHandler());
                    ch.pipeline().addLast(new ChannelInboundHandlerAdapter() {
                        // 连接建立后,向Redis中发送一条指令,注意添加回车与换行
                        @Override
                        public void channelActive(ChannelHandlerContext ctx) {
                            ByteBuf buf = ctx.alloc().buffer();
                            buf.writeBytes("*3".getBytes());
                            buf.writeBytes(LINE);
                            buf.writeBytes("$3".getBytes());
                            buf.writeBytes(LINE);
                            buf.writeBytes("set".getBytes());
                            buf.writeBytes(LINE);
                            buf.writeBytes("$4".getBytes());
                            buf.writeBytes(LINE);
                            buf.writeBytes("name".getBytes());
                            buf.writeBytes(LINE);
                            buf.writeBytes("$8".getBytes());
                            buf.writeBytes(LINE);
                            buf.writeBytes("zhangsan".getBytes());
                            buf.writeBytes(LINE);
                            ctx.writeAndFlush(buf);
                        }

                        // 接收 redis 的返回值
                        @Override
                        public void channelRead(ChannelHandlerContext ctx, Object msg) throws Exception {
                            ByteBuf buf = (ByteBuf) msg;
                            System.out.println(buf.toString(Charset.defaultCharset()));
                        }
                    });
                }
            });
            ChannelFuture channelFuture = bootstrap.connect("localhost", 6379).sync();
            channelFuture.channel().closeFuture().sync();
        } catch (InterruptedException e) {
            log.error("client error", e);
        } finally {
            worker.shutdownGracefully();
        }
    }
}
(2)Http协议
HTTP协议在请求行请求头中都有很多的内容,自己实现较为困难,可以使用HttpServerCodec作为服务器端的解码器与编码器,来处理HTTP请求
// HttpServerCodec 中既有请求的解码器 HttpRequestDecoder 又有响应的编码器 HttpResponseEncoder
// Codec(CodeCombine) 一般代表该类既作为 编码器 又作为 解码器
public final class HttpServerCodec extends CombinedChannelDuplexHandler<HttpRequestDecoder, HttpResponseEncoder>
        implements HttpServerUpgradeHandler.SourceCodec
服务端代码
public class HttpServer {
    static final Logger log = LoggerFactory.getLogger(StudyServer.class);

    public static void main(String[] args) {
        NioEventLoopGroup group = new NioEventLoopGroup();
        new ServerBootstrap()
                .group(group)
                .channel(NioServerSocketChannel.class)
                .childHandler(new ChannelInitializer<SocketChannel>() {
                    @Override
                    protected void initChannel(SocketChannel ch) {
                        ch.pipeline().addLast(new LoggingHandler(LogLevel.DEBUG));
                        // 作为服务器,使用 HttpServerCodec 作为编码器与解码器
                        ch.pipeline().addLast(new HttpServerCodec());
                        // 服务器只处理HTTPRequest
                        ch.pipeline().addLast(new SimpleChannelInboundHandler<HttpRequest>() {
                            @Override
                            protected void channelRead0(ChannelHandlerContext ctx, HttpRequest msg) {
                                // 获得请求uri
                                log.debug(msg.uri());

                                // 获得完整响应,设置版本号与状态码
                                DefaultFullHttpResponse response = new DefaultFullHttpResponse(msg.protocolVersion(), HttpResponseStatus.OK);
                                // 设置响应内容
                                byte[] bytes = "<h1>Hello, World!</h1>".getBytes(StandardCharsets.UTF_8);
                                // 设置响应体长度,避免浏览器一直接收响应内容
                                response.headers().setInt(CONTENT_LENGTH, bytes.length);
                                // 设置响应体
                                response.content().writeBytes(bytes);

                                // 写回响应
                                ctx.writeAndFlush(response);
                            }
                        });
                    }
                })
                .bind(8080);
    }
}服务器负责处理请求并响应浏览器。所以只需要处理HTTP请求即可
// 服务器只处理HTTPRequest
ch.pipeline().addLast(new SimpleChannelInboundHandler<HttpRequest>()获得请求后,需要返回响应给浏览器。需要创建响应对象DefaultFullHttpResponse,设置HTTP版本号及状态码,为避免浏览器获得响应后,因为获得CONTENT_LENGTH而一直空转,需要添加CONTENT_LENGTH字段,表明响应体中数据的具体长度
// 获得完整响应,设置版本号与状态码
DefaultFullHttpResponse response = new DefaultFullHttpResponse(msg.protocolVersion(), HttpResponseStatus.OK);
// 设置响应内容
byte[] bytes = "<h1>Hello, World!</h1>".getBytes(StandardCharsets.UTF_8);
// 设置响应体长度,避免浏览器一直接收响应内容
response.headers().setInt(CONTENT_LENGTH, bytes.length);
// 设置响应体
response.content().writeBytes(bytes);
3、自定义协议
(1)组成要素
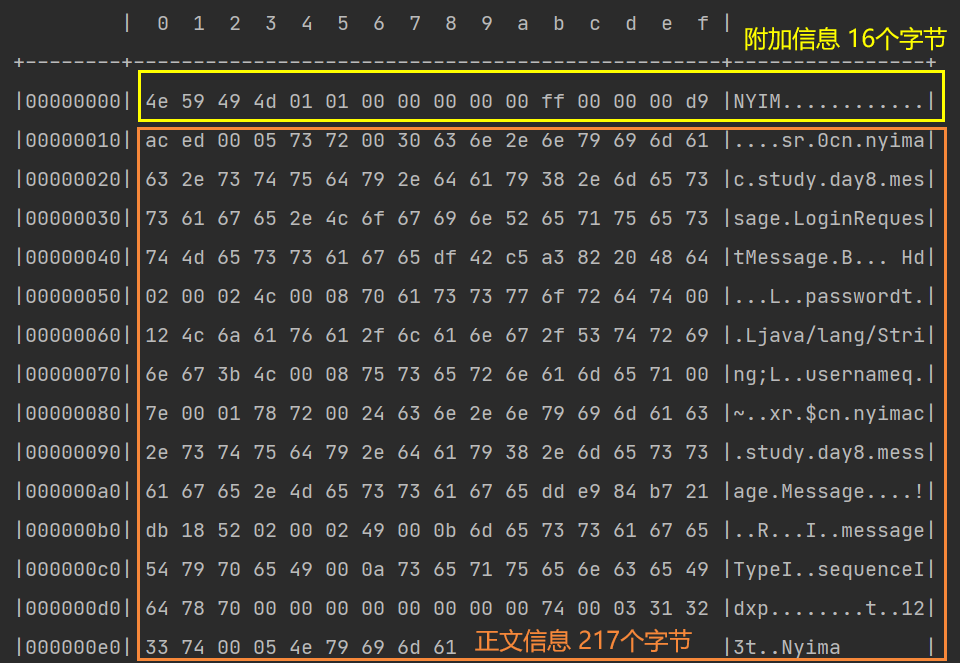
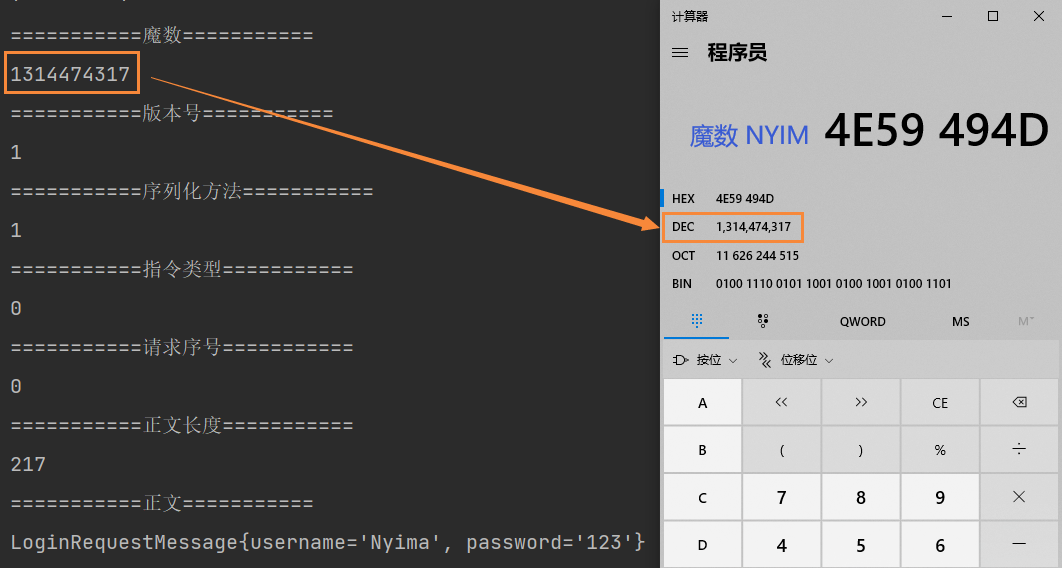
魔数:用来在第一时间判定接收的数据是否为无效数据包(任意的标志)
版本号:可以支持协议的升级
序列化算法:消息正文到底采用哪种序列化反序列化方式
如:json、protobuf、hessian、jdk
指令类型:是登录、注册、单聊、群聊… 跟业务相关
请求序号:为了双工通信,提供异步能力
正文长度
消息正文
(2)编解码器
public class MessageCodec extends ByteToMessageCodec<Message> {

    @Override
    protected void encode(ChannelHandlerContext ctx, Message msg, ByteBuf out) throws Exception {

        // 设置魔数 4个字节
        out.writeBytes(new byte[]{'a','b','c','d'});
        // 设置版本号 1个字节
        out.writeByte(1);
        // 设置序列化方式 1个字节
        out.writeByte(1);
        // 设置指令类型 1个字节
        out.writeByte(msg.getMessageType());
        // 设置请求序号 4个字节
        out.writeInt(msg.getSequenceId());
        // 为了补齐为16个字节,填充1个字节的数据
        out.writeByte(0xff);

        // 获得序列化后的msg
        ByteArrayOutputStream bos = new ByteArrayOutputStream();
        ObjectOutputStream oos = new ObjectOutputStream(bos);
        oos.writeObject(msg);
        byte[] bytes = bos.toByteArray();

        // 获得并设置正文长度 长度用4个字节标识
        out.writeInt(bytes.length);
        // 设置消息正文
        out.writeBytes(bytes);
    }

    @Override
    protected void decode(ChannelHandlerContext ctx, ByteBuf in, List<Object> out) throws Exception {

        // 如果当前 ByteBuf 可读长度小于请求头长度, 直接返回
        if (out.readableBytes() < 16){
            return;
        }

        // 获取魔数
        int magic = in.readInt();
        // 获取版本号
        byte version = in.readByte();
        // 获得序列化方式
        byte seqType = in.readByte();
        // 获得指令类型
        byte messageType = in.readByte();
        // 获得请求序号
        int sequenceId = in.readInt();
        // 移除补齐字节
        in.readByte();
        // 获得正文长度
        int length = in.readInt();

        // 可读长度不足正文长度, 重置读索引
        if (in.readableBytes() < length){
            in.resetReaderIndex();
            return;
        }

        // 获得正文
        byte[] bytes = new byte[length];
        in.readBytes(bytes, 0, length);
        ObjectInputStream ois = new ObjectInputStream(new ByteArrayInputStream(bytes));
        Message message = (Message) ois.readObject();

        // 标记读索引位置,用于重置
        in.markReaderIndex();
        // 将信息放入List中,传递给下一个handler
        out.add(message);

        // 打印获得的信息正文
        System.out.println("===========魔数===========");
        System.out.println(magic);
        System.out.println("===========版本号===========");
        System.out.println(version);
        System.out.println("===========序列化方法===========");
        System.out.println(seqType);
        System.out.println("===========指令类型===========");
        System.out.println(messageType);
        System.out.println("===========请求序号===========");
        System.out.println(sequenceId);
        System.out.println("===========正文长度===========");
        System.out.println(length);
        System.out.println("===========正文===========");
        System.out.println(message);
    }
}编码器与解码器方法源于父类ByteToMessageCodec,通过该类可以自定义编码器与解码器,泛型类型为被编码与被解码的类。此处使用了自定义类Message,代表消息
public class MessageCodec extends ByteToMessageCodec<Message>编码器负责将附加信息与正文信息写入到ByteBuf中,其中附加信息总字节数最好为2n,不足需要补齐。正文内容如果为对象,需要通过序列化将其放入到ByteBuf中
解码器负责将ByteBuf中的信息取出,并放入List中,该List用于将信息传递给下一个handler
(3)测试类
public class TestCodec {
    static final org.slf4j.Logger log = LoggerFactory.getLogger(StudyServer.class);
    public static void main(String[] args) throws Exception {
        EmbeddedChannel channel = new EmbeddedChannel();
        // 添加解码器,避免粘包半包问题
        channel.pipeline().addLast(new LengthFieldBasedFrameDecoder(1024, 12, 4, 0, 0));
        channel.pipeline().addLast(new LoggingHandler(LogLevel.DEBUG));
        channel.pipeline().addLast(new MessageCodec());
        LoginRequestMessage user = new LoginRequestMessage("Nyima", "123");

        // 测试编码与解码
        ByteBuf byteBuf = ByteBufAllocator.DEFAULT.buffer();
        new MessageCodec().encode(null, user, byteBuf);
        channel.writeInbound(byteBuf);
    }
}- 测试类中用到了LengthFieldBasedFrameDecoder,避免粘包半包问题
- 通过MessageCodec的encode方法将附加信息与正文写入到ByteBuf中,通过channel执行入站操作。入站时会调用decode方法进行解码
运行结果
(4)@Sharable
为了提高handler的复用率,可以将handler创建为handler对象,然后在不同的channel中使用该handler对象进行处理操作
LoggingHandler loggingHandler = new LoggingHandler(LogLevel.DEBUG);
// 不同的channel中使用同一个handler对象,提高复用率
channel1.pipeline().addLast(loggingHandler);
channel2.pipeline().addLast(loggingHandler);但是并不是所有的handler都能通过这种方法来提高复用率的,例如LengthFieldBasedFrameDecoder。当多个channel使用同一个LengthFieldBasedFrameDecoder对象,则可能发生如下问题
- channel1中收到了一个半包,
LengthFieldBasedFrameDecoder发现不是一条完整的数据,则没有继续向下传播 - 此时channel2中也收到了一个半包,因为两个channel使用了同一个
LengthFieldBasedFrameDecoder,存入其中的数据刚好拼凑成了一个完整的数据包。LengthFieldBasedFrameDecoder让该数据包继续向下传播,最终引发错误
为了提高handler的复用率,同时又避免出现一些并发问题,Netty中原生的handler中用@Sharable注解来标明,该handler能否在多个channel中共享。
只有带有该注解,才能通过对象的方式被共享,否则无法被共享
自定义编解码器能否使用@Sharable注解
这需要根据自定义的handler的处理逻辑进行分析
我们的MessageCodec本身接收的是LengthFieldBasedFrameDecoder处理之后的数据,那么数据肯定是完整的,按分析来说是可以添加@Sharable注解的
但是实际情况我们并不能添加该注解,会抛出异常信息ChannelHandler cn.nyimac.study.day8.protocol.MessageCodec is not allowed to be shared
- 因为MessageCodec继承自ByteToMessageCodec,ByteToMessageCodec类的注解如下

- 这就意味着ByteToMessageCodec不能被多个channel所共享的
- 原因:因为该类的目标是:将ByteBuf转化为Message,意味着传进该handler的数据还未被处理过。所以传过来的ByteBuf可能并不是完整的数据,如果共享则会出现问题
如果想要共享,需要怎么办呢?
继承MessageToMessageDecoder即可。该类的目标是:将已经被处理的完整数据再次被处理。传过来的Message如果是被处理过的完整数据,那么被共享也就不会出现问题了,也就可以使用@Sharable注解了。实现方式与ByteToMessageCodec类似
@ChannelHandler.Sharable
public class MessageSharableCodec extends MessageToMessageCodec<ByteBuf, Message> {
    @Override
    protected void encode(ChannelHandlerContext ctx, Message msg, List<Object> out) throws Exception {
        ...
    }

    @Override
    protected void decode(ChannelHandlerContext ctx, ByteBuf msg, List<Object> out) throws Exception {
        ...
    }
}
三、聊天室
1、项目结构
client包:存放客户端相关类message包:存放各种类型的消息protocol包:存放自定义协议server包:存放服务器相关类service包:存放用户相关类session包:单聊及群聊相关会话类
(1)服务端模板
@Slf4j
public class ChatServer {
    public static void main(String[] args) {
        NioEventLoopGroup boss = new NioEventLoopGroup();
        NioEventLoopGroup worker = new NioEventLoopGroup();
        LoggingHandler LOGGING_HANDLER = new LoggingHandler(LogLevel.DEBUG);
        // 自定义协议
        MessageCodecSharable MESSAGE_CODEC = new MessageCodecSharable();
        try {
            // 1、启动器
            ServerBootstrap serverBootstrap = new ServerBootstrap();
            // 2、选择服务器的 ServerSocketChannel 实现
            serverBootstrap.channel(NioServerSocketChannel.class);
            // 3、配置包含线程和选择器的组,主从线程模型
            serverBootstrap.group(boss, worker);
            // 4、负责处理连接 worker(child) 负责读写,决定了 worker(child) 能执行那些操作
            serverBootstrap.childHandler(new ChannelInitializer<SocketChannel>() {
                // 连接建立后执行
                @Override
                protected void initChannel(SocketChannel ch) throws Exception {
                    // 长度字段处理器,解决粘包半包问题
                    ch.pipeline().addLast(new ProcotolFrameDecoder());
                    ch.pipeline().addLast(LOGGING_HANDLER);     // 日志处理器
                    ch.pipeline().addLast(MESSAGE_CODEC);       // 自定义协议处理器
                }
            });

            // 绑定端口
            Channel channel = serverBootstrap.bind(8080).sync().channel();
            // 关闭channel
            channel.closeFuture().sync();
        } catch (InterruptedException e) {
            log.error("server error", e);
        } finally {
            // 关闭事件循环组
            boss.shutdownGracefully();
            worker.shutdownGracefully();
        }
    }
}
(2)客户端模板
@Slf4j
public class ChatClient {
    public static void main(String[] args) {
        NioEventLoopGroup group = new NioEventLoopGroup();
        LoggingHandler LOGGING_HANDLER = new LoggingHandler(LogLevel.DEBUG);
        // 自定义协议
        MessageCodecSharable MESSAGE_CODEC = new MessageCodecSharable();
        try {
            // 1、启动器
            Bootstrap bootstrap = new Bootstrap();
            // 2、选择客户端 channel 实现
            bootstrap.channel(NioSocketChannel.class);
            // 3、添加 EventLoopGroup
            bootstrap.group(group);
            // 4、添加处理器
            bootstrap.handler(new ChannelInitializer<SocketChannel>() {
                // 该方法在连接建立后调用
                @Override
                protected void initChannel(SocketChannel ch) throws Exception {
                    // 长度字段处理器,解决粘包半包问题
                    ch.pipeline().addLast(new ProcotolFrameDecoder());
                    ch.pipeline().addLast(LOGGING_HANDLER);     // 日志处理器
                    ch.pipeline().addLast(MESSAGE_CODEC);       // 自定义协议处理器
                }
            });
            // 5、连接到服务器
            Channel channel = bootstrap.connect("localhost", 8080).sync().channel();
            // 6、关闭channel
            channel.closeFuture().sync();
        } catch (Exception e) {
            log.error("client error", e);
        } finally {
            group.shutdownGracefully();
        }
    }
}
(3)编解码处理器
@Slf4j
@ChannelHandler.Sharable
/**
 * 必须和 LengthFieldBasedFrameDecoder 一起使用,确保接到的 ByteBuf 消息是完整的
 */
public class MessageCodecSharable extends MessageToMessageCodec<ByteBuf, Message> {
    @Override
    protected void encode(ChannelHandlerContext ctx, Message msg, List<Object> outList) throws Exception {
        ByteBuf out = ctx.alloc().buffer();
        // 1. 4 字节的魔数
        out.writeBytes(new byte[]{1, 2, 3, 4});
        // 2. 1 字节的版本,
        out.writeByte(1);
        // 3. 1 字节的序列化方式 jdk 0 , json 1
        out.writeByte(0);
        // 4. 1 字节的指令类型
        out.writeByte(msg.getMessageType());
        // 5. 4 个字节
        out.writeInt(msg.getSequenceId());
        // 无意义,对齐填充
        out.writeByte(0xff);
        // 6. 获取内容的字节数组,也可使用json
        ByteArrayOutputStream bos = new ByteArrayOutputStream();
        ObjectOutputStream oos = new ObjectOutputStream(bos);
        oos.writeObject(msg);
        byte[] bytes = bos.toByteArray();
        // 7. 长度
        out.writeInt(bytes.length);
        // 8. 写入内容
        out.writeBytes(bytes);
        outList.add(out);
    }

    @Override
    protected void decode(ChannelHandlerContext ctx, ByteBuf in, List<Object> out) throws Exception {
        int magicNum = in.readInt();
        byte version = in.readByte();
        byte serializerType = in.readByte();
        byte messageType = in.readByte();
        int sequenceId = in.readInt();
        in.readByte();
        int length = in.readInt();
        byte[] bytes = new byte[length];
        in.readBytes(bytes, 0, length);
        ObjectInputStream ois = new ObjectInputStream(new ByteArrayInputStream(bytes));
        Message message = (Message) ois.readObject();
        log.debug("{}, {}, {}, {}, {}, {}", magicNum, version, serializerType, messageType, sequenceId, length);
        log.debug("{}", message);
        out.add(message);
    }
}
(4)粘包半包处理器
public class ProcotolFrameDecoder extends LengthFieldBasedFrameDecoder {

    public ProcotolFrameDecoder() {
        this(1024, 12, 4, 0, 0);
    }

    public ProcotolFrameDecoder(int maxFrameLength, int lengthFieldOffset, int lengthFieldLength, int lengthAdjustment, int initialBytesToStrip) {
        super(maxFrameLength, lengthFieldOffset, lengthFieldLength, lengthAdjustment, initialBytesToStrip);
    }
}
(5)自定义消息体
示例实现类
@Data
@ToString(callSuper = true)
public class ChatRequestMessage extends Message {
    private String content;
    private String to;
    private String from;

    public ChatRequestMessage() {
    }

    public ChatRequestMessage(String from, String to, String content) {
        this.from = from;
        this.to = to;
        this.content = content;
    }

    @Override
    public int getMessageType() {
        return ChatRequestMessage;
    }
}
接口
@Data
public abstract class Message implements Serializable {

    public static Class<?> getMessageClass(int messageType) {
        return messageClasses.get(messageType);
    }

    private int sequenceId;

    private int messageType;

    public abstract int getMessageType();

    public static final int LoginRequestMessage = 0;
    public static final int LoginResponseMessage = 1;
    public static final int ChatRequestMessage = 2;
    public static final int ChatResponseMessage = 3;
    public static final int GroupCreateRequestMessage = 4;
    public static final int GroupCreateResponseMessage = 5;
    public static final int GroupJoinRequestMessage = 6;
    public static final int GroupJoinResponseMessage = 7;
    public static final int GroupQuitRequestMessage = 8;
    public static final int GroupQuitResponseMessage = 9;
    public static final int GroupChatRequestMessage = 10;
    public static final int GroupChatResponseMessage = 11;
    public static final int GroupMembersRequestMessage = 12;
    public static final int GroupMembersResponseMessage = 13;
    public static final int PingMessage = 14;
    public static final int PongMessage = 15;
    private static final Map<Integer, Class<?>> messageClasses = new HashMap<>();

    static {
        messageClasses.put(LoginRequestMessage, LoginRequestMessage.class);
        messageClasses.put(LoginResponseMessage, LoginResponseMessage.class);
        messageClasses.put(ChatRequestMessage, ChatRequestMessage.class);
        messageClasses.put(ChatResponseMessage, ChatResponseMessage.class);
        messageClasses.put(GroupCreateRequestMessage, GroupCreateRequestMessage.class);
        messageClasses.put(GroupCreateResponseMessage, GroupCreateResponseMessage.class);
        messageClasses.put(GroupJoinRequestMessage, GroupJoinRequestMessage.class);
        messageClasses.put(GroupJoinResponseMessage, GroupJoinResponseMessage.class);
        messageClasses.put(GroupQuitRequestMessage, GroupQuitRequestMessage.class);
        messageClasses.put(GroupQuitResponseMessage, GroupQuitResponseMessage.class);
        messageClasses.put(GroupChatRequestMessage, GroupChatRequestMessage.class);
        messageClasses.put(GroupChatResponseMessage, GroupChatResponseMessage.class);
        messageClasses.put(GroupMembersRequestMessage, GroupMembersRequestMessage.class);
        messageClasses.put(GroupMembersResponseMessage, GroupMembersResponseMessage.class);
    }
}
2、登录
(1)服务端
接收客户端请求的消息,判断用户名密码是否匹配,返回结果
// **************登录处理器 -- start ****************
ch.pipeline().addLast(new SimpleChannelInboundHandler<LoginRequestMessage>() {
    // 只有接收到指定泛型的类型的消息才会执行
    @Override
    protected void channelRead0(ChannelHandlerContext ctx, LoginRequestMessage loginRequestMessage) throws Exception {
        boolean login = userServiceMemory.login(loginRequestMessage.getUsername(), loginRequestMessage.getPassword());
        LoginResponseMessage message;
        if (login){
            // 存储用户和channel的绑定关系
            SessionFactory.getSession().bind(ctx.channel(),loginRequestMessage.getUsername());
            message = new LoginResponseMessage(true, "登录成功");
        }else{
            message = new LoginResponseMessage(false, "登录失败");
        }
        ctx.writeAndFlush(message);
    }
});
// **************登录处理器 -- end ****************
(2)客户端
执行流程

方法的变量
NioEventLoopGroup group = new NioEventLoopGroup();
LoggingHandler LOGGING_HANDLER = new LoggingHandler(LogLevel.DEBUG);
// 自定义协议
MessageCodecSharable MESSAGE_CODEC = new MessageCodecSharable();

// ************************************************************
// 每次有线程调用 countDown() 数量-1,当计数器变为0,countDownLatch.await() 就会被唤醒!
CountDownLatch WAIT_FOR_LOGIN = new CountDownLatch(1);
// 标志该用户是否登录成功;原子类:多线程情况下保证线程安全
AtomicBoolean LOGIN = new AtomicBoolean(false);
// ************************************************************
处理器
// **************登录处理器 -- start ****************
ch.pipeline().addLast(new ChannelInboundHandlerAdapter() {
    // 通道准备就绪时运行
    @Override
    public void channelActive(ChannelHandlerContext ctx) throws Exception {
        new Thread(()->{
            // 获取用户输入
            Scanner sc = new Scanner(System.in);
            System.out.println("请输入用户名");
            String username = sc.next();
            System.out.println("请输入密码");
            String password = sc.next();
            System.out.println("请输入昵称");
            String nickname = sc.next();
            LoginRequestMessage message = new LoginRequestMessage(username, password, nickname);
            // 发送登录请求
            ctx.writeAndFlush(message);

            try {
                // 线程进入阻塞等待状态,当线程计数器为0时唤醒
                WAIT_FOR_LOGIN.await();
            } catch (InterruptedException e) {
                e.printStackTrace();
            }

            // 判断是否登录成功
            if (!LOGIN.get()){
                // 登录失败
                ctx.channel().close();
                System.out.println("登录失败,通道关闭");
                return;
            }

            // 登录成功,执行聊天业务。。。
            System.out.println("登录成功,开始聊天");
        },"login thread").start();
    }

    // 读取服务器响应的数据
    @Override
    public void channelRead(ChannelHandlerContext ctx, Object msg) throws Exception {
        if (msg instanceof LoginResponseMessage){
            LoginResponseMessage message = (LoginResponseMessage) msg;
            if (message.isSuccess()){
                LOGIN.set(true);
            }
            // 线程计数器减一,唤醒用户输入线程
            WAIT_FOR_LOGIN.countDown();
        }


        //默认行为channelRead在ChannelInboundHandlerAdapter将msg转发到下一个ChannelInboundHandler。
        // 如果没有其他处理程序在意msg,则无需调用它。
        super.channelRead(ctx, msg);
    }
});
// **************登录处理器 -- end ****************
3、单聊
客户端输入send username content即可发送单聊消息,需要服务器端添加处理ChatRequestMessage的handler
(1)服务端
chatServer
// 单聊处理器
ch.pipeline().addLast(new ChatMessageHandler());
ChatMessageHandler
/**
 * 单聊接收客户端发送消息处理器
 */
@Slf4j
@ChannelHandler.Sharable // 必须添加该注解
public class ChatMessageHandler extends SimpleChannelInboundHandler<ChatRequestMessage> {

    @Override
    protected void channelRead0(ChannelHandlerContext ctx, ChatRequestMessage msg) throws Exception {
        log.debug("单聊发送信息{}",msg);
        // 1、根据用户获取对应的 channel
        Channel channel = SessionFactory.getSession().getChannel(msg.getTo());
        // 2、向目标用户发送消息
        channel.writeAndFlush(new ChatResponseMessage(msg.getFrom(),msg.getContent()));
    }
}
(2)客户端
// **************接收消息处理器 -- start ****************
ch.pipeline().addLast(new SimpleChannelInboundHandler<ChatResponseMessage>() {

    @Override
    protected void channelRead0(ChannelHandlerContext ctx, ChatResponseMessage msg) throws Exception {
        System.out.println(msg.getFrom()+": "+msg.getContent());
    }
});
// **************接收消息处理器 -- end ****************
4、创建群聊
(1)服务端
添加处理器
// 创建群聊处理器
GroupCreateMessageHandler groupCreateMessageHandler = new GroupCreateMessageHandler();

...

// 创建群聊处理器
ch.pipeline().addLast(groupCreateMessageHandler);
处理器
/**
 * 创建群聊处理器
 */
@ChannelHandler.Sharable // 必须添加该注解
public class GroupCreateMessageHandler extends SimpleChannelInboundHandler<GroupCreateRequestMessage> {
    @Override
    protected void channelRead0(ChannelHandlerContext ctx, GroupCreateRequestMessage msg) throws Exception {
        // 获得要创建的群聊名
        String groupName = msg.getGroupName();
        // 获得要创建的群聊的成员组
        Set<String> members = msg.getMembers();
        // 判断该群聊是否创建过,未创建返回null并创建群聊
        Group group = GroupSessionFactory.getGroupSession().createGroup(groupName, members);
        if (group == null) {
            // 发送创建成功消息
            GroupCreateResponseMessage groupCreateResponseMessage = new GroupCreateResponseMessage(true, groupName + "创建成功");
            ctx.writeAndFlush(groupCreateResponseMessage);
            // 获得在线群员的channel,给群员发送入群聊消息
            List<Channel> membersChannel = GroupSessionFactory.getGroupSession().getMembersChannel(groupName);
            groupCreateResponseMessage = new GroupCreateResponseMessage(true, "您已被拉入"+groupName);
            // 给每个在线群员发送消息
            for(Channel channel : membersChannel) {
                channel.writeAndFlush(groupCreateResponseMessage);
            }
        } else {
            // 发送失败消息
            GroupCreateResponseMessage groupCreateResponseMessage = new GroupCreateResponseMessage(false, groupName + "已存在");
            ctx.writeAndFlush(groupCreateResponseMessage);
        }
    }
}
(2)客户端
/**
 * 创建群聊的返回值 处理器
 */
@Slf4j
@ChannelHandler.Sharable // 必须添加该注解
public class ClientGroupCreateResponseHandler extends SimpleChannelInboundHandler<GroupCreateResponseMessage> {
    @Override
    protected void channelRead0(ChannelHandlerContext ctx, GroupCreateResponseMessage msg) throws Exception {
        if (msg.isSuccess()){
            System.out.println(msg.getReason());
        }else{
            System.out.println("群聊创建失败,失败原因:"+msg.getReason());
        }
    }
}
5、发送群聊消息
(1)服务端
/**
 * 群聊处理器
 */
@Slf4j
@ChannelHandler.Sharable // 必须添加该注解
public class GroupChatMessageHandler extends SimpleChannelInboundHandler<GroupChatRequestMessage> {

    @Override
    protected void channelRead0(ChannelHandlerContext ctx, GroupChatRequestMessage msg) throws Exception {

        // 1、根据组名获取聊天组成员的 channel
        List<Channel> channels = GroupSessionFactory.getGroupSession().getMembersChannel(msg.getGroupName());

        // 2、判断群聊是否存在
        if (channels.size() == 0){
            ctx.writeAndFlush(new GroupChatResponseMessage(false,"该群聊不存在"));
            return;
        }

        // 3、判断发出者是否在群聊中
        if (!channels.contains(ctx.channel())){
            ctx.writeAndFlush(new GroupChatResponseMessage(false,"您不在该群聊,无法发送消息"));
            return;
        }

        // 4、群聊消息
        log.debug("群聊消息:{}",msg);
        channels.forEach((channel)->{
            channel.writeAndFlush(new GroupChatResponseMessage(msg.getGroupName(), msg.getFrom(), msg.getContent()));
        });
    }
}
(2)客户端
/**
 * 接收群聊信息处理器
 */
public class ClientGroupChatResponseHandler extends SimpleChannelInboundHandler<GroupChatResponseMessage> {
    @Override
    protected void channelRead0(ChannelHandlerContext ctx, GroupChatResponseMessage msg) throws Exception {
        if (!msg.isSuccess()){
            System.out.println("发送群聊消息失败");
            return;
        }
        System.out.println("收到群聊信息,群聊名称:"+msg.getGroupName()+",发送人:"+msg.getFrom()+",消息:"+msg.getContent());
    }
}
6、用户下线
服务端
/**
 * 用户退出处理器
 */
@Slf4j
@ChannelHandler.Sharable
public class QuitHandler extends ChannelInboundHandlerAdapter {

    // 连接端开始触发
    @Override
    public void channelInactive(ChannelHandlerContext ctx) throws Exception {
        // 解绑会话
        SessionFactory.getSession().unbind(ctx.channel());
        System.out.println(ctx.channel()+"断开连接");
        //super.channelInactive(ctx);
    }

    // 捕获到异常时触发
    @Override
    public void exceptionCaught(ChannelHandlerContext ctx, Throwable cause) throws Exception {
        // 解绑会话
        SessionFactory.getSession().unbind(ctx.channel());
        System.out.println("连接断开,异常是:"+ cause.getMessage());
        //super.exceptionCaught(ctx, cause);
    }
}
7、心跳机制
(1)连接假死
原因
- 网络设备出现故障,例如网卡,机房等,底层的 TCP 连接已经断开了,但应用程序没有感知到,仍然占用着资源
- 公网网络不稳定,出现丢包。如果连续出现丢包,这时现象就是客户端数据发不出去,服务端也一直收不到数据,会白白地消耗资源
- 应用程序线程阻塞,无法进行数据读写
问题
- 假死的连接占用的资源不能自动释放
- 向假死的连接发送数据,得到的反馈是发送超时
(2)解决方法
可以添加IdleStateHandler对空闲时间进行检测,通过构造函数可以传入三个参数
readerIdleTimeSeconds读空闲经过的秒数writerIdleTimeSeconds写空闲经过的秒数allIdleTimeSeconds读和写空闲经过的秒数
当指定时间内未发生读或写事件时,会触发特定事件
- 读空闲会触发
READER_IDLE - 写空闲会触发
WRITE_IDLE - 读和写空闲会触发
ALL_IDEL
想要处理这些事件,需要自定义事件处理函数
服务端
// 空闲处理器
// 用来判断是不是 读空闲时间过长,或 写空闲时间过长
// 5s 内如果没有收到 channel 的数据,会触发一个 IdleState#READER_IDLE 事件
ch.pipeline().addLast(new IdleStateHandler(5,0,0));
// // ChannelDuplexHandler 可以同时作为入站和出站处理器
ch.pipeline().addLast(new ChannelDuplexHandler(){
    @Override
    public void userEventTriggered(ChannelHandlerContext ctx, Object evt) throws Exception {
        IdleStateEvent event = (IdleStateEvent) evt;
        // 触发读空闲事件
        if (event.state() == IdleState.READER_IDLE){
            System.out.println("已经 5 秒没读到数据了");
            // 断开连接
            ctx.channel().close();
        }
        //super.userEventTriggered(ctx, evt);
    }
});- 使用
IdleStateHandler进行空闲检测 - 使用双向处理器
ChannelDuplexHandler对入站与出站事件进行处理IdleStateHandler中的事件为特殊事件,需要实现ChannelDuplexHandler的userEventTriggered方法,判断事件类型并自定义处理方式,来对事件进行处理
为避免因非网络等原因引发的READ_IDLE事件,比如网络情况良好,只是用户本身没有输入数据,这时发生READ_IDLE事件,直接让服务器断开连接是不可取的
为避免此类情况,需要在客户端向服务器发送心跳包,发送频率要小于服务器设置的IdleTimeSeconds,一般设置为其值的一半
客户端代码
// 发送心跳包,让服务器知道客户端在线
// 3s未发生WRITER_IDLE,就像服务器发送心跳包
// 该值为服务器端设置的READER_IDLE触发时间的一半左右
ch.pipeline().addLast(new IdleStateHandler(0, 3, 0));
ch.pipeline().addLast(new ChannelDuplexHandler() {
    @Override
    public void userEventTriggered(ChannelHandlerContext ctx, Object evt) throws Exception {
        IdleStateEvent event = (IdleStateEvent) evt;
        if (event.state() == IdleState.WRITER_IDLE) {
            // 发送心跳包,自定义message
            ctx.writeAndFlush(new PingMessage());
        }
    }
});
四、优化
1、拓展序列化算法
(1)序列化接口
public interface Serializer {
    /**
     * 序列化
     * @param object 被序列化的对象
     * @param <T> 被序列化对象类型
     * @return 序列化后的字节数组
     */
    <T> byte[] serialize(T object);

    /**
     * 反序列化
     * @param clazz 反序列化的目标类的Class对象
     * @param bytes 被反序列化的字节数组
     * @param <T> 反序列化目标类
     * @return 反序列化后的对象
     */
    <T> T deserialize(Class<T> clazz, byte[] bytes);
}
(2)枚举实现类
public enum SerializerAlgorithm implements Serializer {
    // Java的序列化和反序列化
    Java {
        @Override
        public <T> byte[] serialize(T object) {
            // 序列化后的字节数组
            byte[] bytes = null;
            try (ByteArrayOutputStream bos = new ByteArrayOutputStream();
                 ObjectOutputStream oos = new ObjectOutputStream(bos)) {
                oos.writeObject(object);
                bytes = bos.toByteArray();
            } catch (IOException e) {
                e.printStackTrace();
            }
            return bytes;
        }

        @Override
        public <T> T deserialize(Class<T> clazz, byte[] bytes) {
            T target = null;
            System.out.println(Arrays.toString(bytes));
            try (ByteArrayInputStream bis = new ByteArrayInputStream(bytes);
                 ObjectInputStream ois = new ObjectInputStream(bis)) {
                target = (T) ois.readObject();
            } catch (IOException | ClassNotFoundException e) {
                e.printStackTrace();
            }
            // 返回反序列化后的对象
            return target;
        }
    }

     // Json的序列化和反序列化
    Json {
        @Override
        public <T> byte[] serialize(T object) {
            String s = new Gson().toJson(object);
            System.out.println(s);
            // 指定字符集,获得字节数组
            return s.getBytes(StandardCharsets.UTF_8);
        }

        @Override
        public <T> T deserialize(Class<T> clazz, byte[] bytes) {
            String s = new String(bytes, StandardCharsets.UTF_8);
            System.out.println(s);
            // 此处的clazz为具体类型的Class对象,而不是父类Message的
            return new Gson().fromJson(s, clazz);
        }
    }
}
(3)修改原编解码器
编码
// 获得序列化后的msg
// 使用指定的序列化方式
SerializerAlgorithm[] values = SerializerAlgorithm.values();
// 获得序列化后的对象
byte[] bytes = values[out.getByte(5)-1].serialize(msg);
解码
// 获得反序列化方式
SerializerAlgorithm[] values = SerializerAlgorithm.values();
// 通过指定方式进行反序列化
// 需要通过Message的方法获得具体的消息类型
Message message = values[seqType-1].deserialize(Message.getMessageClass(messageType), bytes);
2、参数调优
(0)配置参数
- 客户端通过
Bootstrap.option函数来配置参数,配置参数作用于 SocketChannel - 服务器通过
ServerBootstrap来配置参数,但是对于不同的 Channel 需要选择不同的方法- 通过
option来配置 ServerSocketChannel 上的参数 - 通过
childOption来配置 SocketChannel 上的参数
- 通过
option主要是针对boss线程组(处理连接),child主要是针对worker线程组
(1)建立连接超时
CONNECT_TIMEOUT_MILLIS
- 属于 SocketChannal 的参数
- 用在客户端建立连接时,如果在指定毫秒内无法连接,会抛出 timeout 异常
- 注意:Netty 中不要用成了SO_TIMEOUT 主要用在阻塞 IO,而 Netty 是非阻塞 IO
使用
public class TestParam {
    public static void main(String[] args) {
        // 客户端
        // SocketChannel 5s内未建立连接就抛出异常
        new Bootstrap().option(ChannelOption.CONNECT_TIMEOUT_MILLIS, 5000);

        // 服务器端
        // ServerSocketChannel 5s内未建立连接就抛出异常
        new ServerBootstrap().option(ChannelOption.CONNECT_TIMEOUT_MILLIS,5000);
        // SocketChannel 5s内未建立连接就抛出异常
        new ServerBootstrap().childOption(ChannelOption.CONNECT_TIMEOUT_MILLIS, 5000);
    }
}
源码分析
客户端中连接服务器的线程是 NIO 线程,抛出异常的是主线程。这是如何做到超时判断以及线程通信的呢?
AbstractNioChannel.AbstractNioUnsafe.connect方法中
public final void connect(
                final SocketAddress remoteAddress, final SocketAddress localAddress, final ChannelPromise promise) {

    ...

    // Schedule connect timeout.
    // 设置超时时间,通过option方法传入的CONNECT_TIMEOUT_MILLIS参数进行设置
    int connectTimeoutMillis = config().getConnectTimeoutMillis();
    // 如果超时时间大于0
    if (connectTimeoutMillis > 0) {
        // 创建一个定时任务,延时connectTimeoutMillis(设置的超时时间时间)后执行
        // schedule(Runnable command, long delay, TimeUnit unit)
        connectTimeoutFuture = eventLoop().schedule(new Runnable() {
            @Override
            public void run() {
                // 判断是否建立连接,Promise进行NIO线程与主线程之间的通信
                // 如果超时,则通过tryFailure方法将异常放入Promise中
                // 在主线程中抛出
                ChannelPromise connectPromise = AbstractNioChannel.this.connectPromise;
                ConnectTimeoutException cause = new ConnectTimeoutException("connection timed out: " + remoteAddress);
                if (connectPromise != null && connectPromise.tryFailure(cause)) {
                    close(voidPromise());
                }
            }
        }, connectTimeoutMillis, TimeUnit.MILLISECONDS);
    }

       ...

}超时的判断主要是通过 Eventloop 的 schedule 方法和 Promise 共同实现的
- schedule 设置了一个定时任务,延迟
connectTimeoutMillis秒后执行该方法 - 如果指定时间内没有建立连接,则会执行其中的任务
- 任务负责创建
ConnectTimeoutException异常,并将异常通过 Pormise 传给主线程并抛出
- 任务负责创建
(2)SO_BACKLOG
该参数是 ServerSocketChannel 的参数
三次握手与连接队列
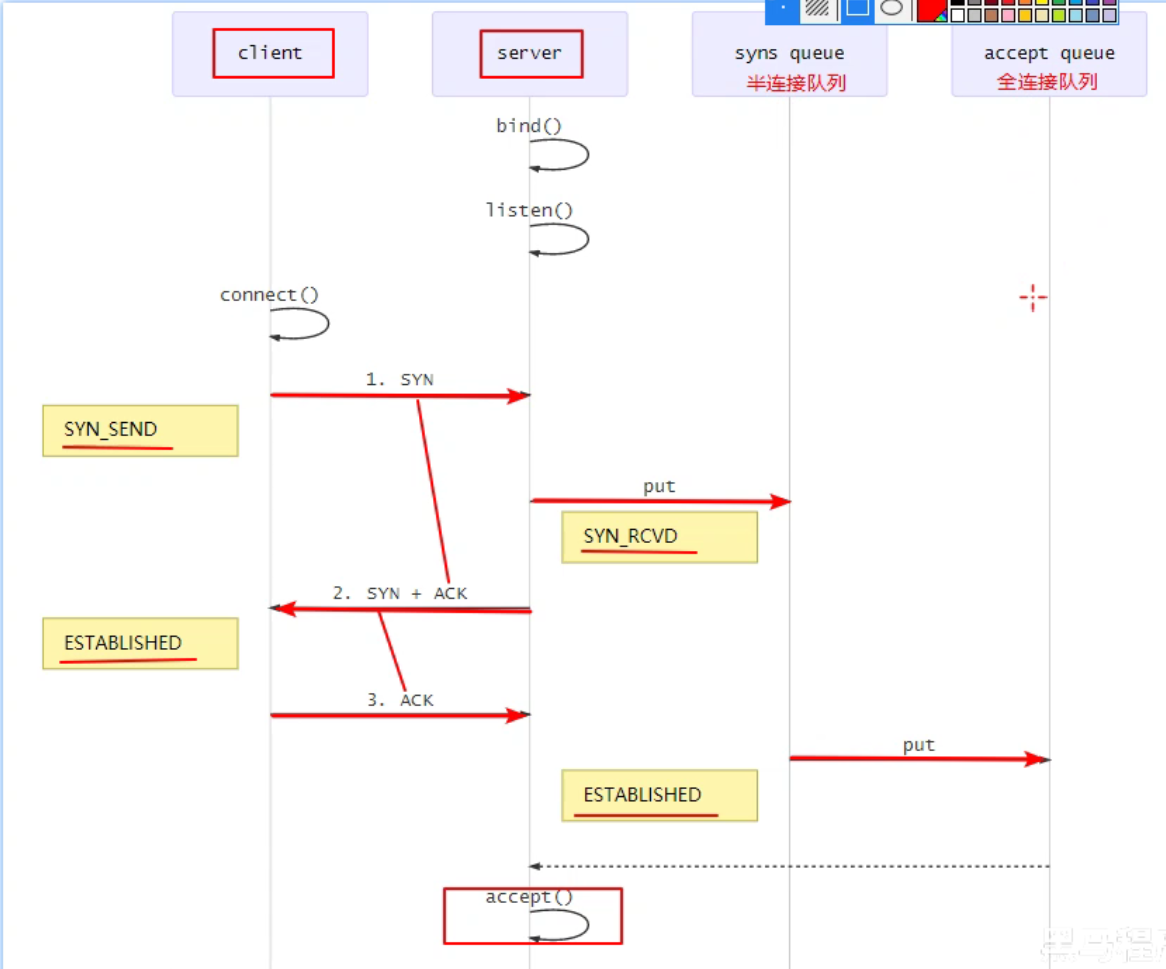
简单易懂的解释
(1)第一次握手时,因为客户端与服务器之间的连接还未完全建立,连接会被放入半连接队列中
(2)当完成三次握手以后,连接会被放入全连接队列中
(3)服务器处理Accept事件是在TCP三次握手,也就是建立连接之后。服务器会从全连接队列中获取连接并进行处理
详细的解释
- 第一次握手,client 发送 SYN 到 server,状态修改为 SYN_SEND,server 收到,状态改变为 SYN_REVD,并将该请求放入 sync queue 队列
- 第二次握手,server 回复 SYN + ACK 给 client,client 收到,状态改变为 ESTABLISHED,并发送 ACK 给 server
- 第三次握手,server 收到 ACK,状态改变为 ESTABLISHED,将该请求从 sync queue 放入 accept queue
Linux的backlog 参数
在 linux 2.2 之前,backlog 大小包括了两个队列的大小,在 linux 2.2 之后,分别用下面两个参数来控制
- 半连接队列 -
sync queue- 大小通过
/proc/sys/net/ipv4/tcp_max_syn_backlog指定,在syncookies启用的情况下,逻辑上没有最大值限制,这个设置便被忽略
- 大小通过
- 全连接队列 -
accept queue- 其大小通过
/proc/sys/net/core/somaxconn指定,在使用 listen 函数时,内核会根据传入的 backlog 参数与系统参数,取二者的较小值 - 如果 accpet queue 队列满了,server 将发送一个拒绝连接的错误信息到 client
- 其大小通过
SO_BACKLOG作用
在Netty中,SO_BACKLOG主要用于设置全连接队列的大小。当处理Accept的速率小于连接建立的速率时,全连接队列中堆积的连接数大于SO_BACKLOG设置的值是,便会抛出异常
设置方式如下
// 设置全连接队列,大小为2
new ServerBootstrap().option(ChannelOption.SO_BACKLOG, 2);
SO_BACKLOG默认值
backlog参数在NioSocketChannel.doBind方法被使用
@Override
protected void doBind(SocketAddress localAddress) throws Exception {
    if (PlatformDependent.javaVersion() >= 7) {
        javaChannel().bind(localAddress, config.getBacklog());
    } else {
        javaChannel().socket().bind(localAddress, config.getBacklog());
    }
}其中backlog被保存在了DefaultServerSocketChannelConfig配置类中
private volatile int backlog = NetUtil.SOMAXCONN;具体的赋值操作如下
SOMAXCONN = AccessController.doPrivileged(new PrivilegedAction<Integer>() {
    @Override
    public Integer run() {
        // Determine the default somaxconn (server socket backlog) value of the platform.
        // The known defaults:
        // - Windows NT Server 4.0+: 200
        // - Linux and Mac OS X: 128
        int somaxconn = PlatformDependent.isWindows() ? 200 : 128;
        File file = new File("/proc/sys/net/core/somaxconn");
        BufferedReader in = null;
        try {
            // file.exists() may throw a SecurityException if a SecurityManager is used, so execute it in the
            // try / catch block.
            // See https://github.com/netty/netty/issues/4936
            if (file.exists()) {
                in = new BufferedReader(new FileReader(file));
                // 将somaxconn设置为Linux配置文件中设置的值
                somaxconn = Integer.parseInt(in.readLine());
                if (logger.isDebugEnabled()) {
                    logger.debug("{}: {}", file, somaxconn);
                }
            } else {
                ...
            }
            ...
        }
        // 返回backlog的值
        return somaxconn;
    }
}
backlog的值会根据操作系统的不同,来
选择不同的默认值
- Windows
200 - Linux/Mac OS
128
- Windows
如果配置文件
/proc/sys/net/core/somaxconn存在,会读取配置文件中的值,并将backlog的值设置为配置文件中指定的
(3)ulimit -n
- 属于操作系统参数
- 最大文件限制数
- 在linux下一切皆文件,开启一个进程就是打开一个文件,控制ulimit大小作用等同于限制进程及其子进程的资源使用
使用ulimit -a 可以查看当前系统的所有限制值,使用ulimit -n 可以查看当前的最大打开文件数。
新装的 linux 默认只有1024,当作负载较大的服务器时,很容易遇到error: too many open files。因此,需要将其改大。
使用 ulimit -n 65535 可即时修改,但重启后就无效了。(注ulimit -SHn 65535 等效 ulimit -n 65535,-S指soft,-H指hard)
设置永久 生效
可以修改配置文件/etc/profile
vi /etc/profile加入一行
ulimit -SHn 65536保存退出。然后加载配置文件。
source /etc/profile再次查看ulimit
ulimit -n第二种修改方法
在/etc/security/limits.conf最后增加如下两行记录
soft nofile 65535
hard nofile 65535
(4)TCP_NODELAY
- 属于 SocketChannal 参数
- 因为 Nagle 算法,数据包会堆积到一定的数量后一起发送,这就可能导致数据的发送存在一定的延时
- 该参数默认为false,如果不希望的发送被延时,则需要将该值设置为true
在有些网络通信的场景下,要求低延迟,这样就需要我们设置一些TCP的链接属性:
在客户端我们需要这样设置:
bootstap.option(ChannelOption.TCP_NODELAY, true); 在服务器端是在worker的Channel端设置属性,
boot.childOption(ChannelOption.TCP_NODELAY, true); 设置这样做好的好处就是禁用nagle算法
Nagle算法试图减少TCP包的数量和结构性开销, 将多个较小的包组合成较大的包进行发送.但这不是重点, 关键是这个算法受TCP延迟确认影响, 会导致相继两次向连接发送请求包,
读数据时会有一个最多达500毫秒的延时.
TCP/IP协议中,无论发送多少数据,总是要在数据前面加上协议头,同时,对方接收到数据,也需要发送ACK表示确认。为了尽可能的利用网络带宽,TCP总是希望尽可能的发送足够大的数据。(一个连接会设置MSS参数,因此,TCP/IP希望每次都能够以MSS尺寸的数据块来发送数据)。
Nagle算法就是为了尽可能发送大块数据,避免网络中充斥着许多小数据块。
(5)SO_SNDBUF & SO_RCVBUF
- SO_SNDBUF 属于 SocketChannal 参数
- SO_RCVBUF 既可用于 SocketChannal 参数,也可以用于 ServerSocketChannal 参数(建议设置到 ServerSocketChannal 上)
- 该参数用于指定接收方与发送方的滑动窗口大小
(6)ALLOCATOR
- 属于 SocketChannal 参数
- 用来配置 ByteBuf 是池化还是非池化,是直接内存还是堆内存
使用
// 选择ALLOCATOR参数,设置SocketChannel中分配的ByteBuf类型
// 第二个参数需要传入一个ByteBufAllocator,用于指定生成的 ByteBuf 的类型
new ServerBootstrap().childOption(ChannelOption.ALLOCATOR, new PooledByteBufAllocator());
ByteBufAllocator类型
池化并使用直接内存
// true表示使用直接内存
new PooledByteBufAllocator(true);Copy
池化并使用堆内存
// false表示使用堆内存
new PooledByteBufAllocator(false);Copy
非池化并使用直接内存
// ture表示使用直接内存
new UnpooledByteBufAllocator(true);Copy
非池化并使用堆内存
// false表示使用堆内存
new UnpooledByteBufAllocator(false);Copy
(7)RCVBUF_ALLOCATOR
- 属于 SocketChannal 参数
- 控制 Netty 接收缓冲区大小
- 负责入站数据的分配,决定入站缓冲区的大小(并可动态调整),统一采用 direct 直接内存,具体池化还是非池化由 allocator 决定
3、参数大全
(1)通用参数
CONNECT_TIMEOUT_MILLIS
Netty参数,连接超时毫秒数,默认值30000毫秒即30秒。
MAX_MESSAGES_PER_READ
Netty参数,一次Loop读取的最大消息数,对于ServerChannel或者NioByteChannel,默认值为16,其他Channel默认值为1。默认值这样设置,是因为:ServerChannel需要接受足够多的连接,保证大吞吐量,NioByteChannel可以减少不必要的系统调用select。
WRITE_SPIN_COUNT
Netty参数,一个Loop写操作执行的最大次数,默认值为16。也就是说,对于大数据量的写操作至多进行16次,如果16次仍没有全部写完数据,此时会提交一个新的写任务给EventLoop,任务将在下次调度继续执行。这样,其他的写请求才能被响应不会因为单个大数据量写请求而耽误。
ALLOCATOR
Netty参数,ByteBuf的分配器,默认值为ByteBufAllocator.DEFAULT,4.0版本为UnpooledByteBufAllocator,4.1版本为PooledByteBufAllocator。该值也可以使用系统参数io.netty.allocator.type配置,使用字符串值:”unpooled”,”pooled”。
RCVBUF_ALLOCATOR
Netty参数,用于Channel分配接受Buffer的分配器,默认值为AdaptiveRecvByteBufAllocator.DEFAULT,是一个自适应的接受缓冲区分配器,能根据接受到的数据自动调节大小。可选值为FixedRecvByteBufAllocator,固定大小的接受缓冲区分配器。
AUTO_READ
Netty参数,自动读取,默认值为True。Netty只在必要的时候才设置关心相应的I/O事件。对于读操作,需要调用channel.read()设置关心的I/O事件为OP_READ,这样若有数据到达才能读取以供用户处理。该值为True时,每次读操作完毕后会自动调用channel.read(),从而有数据到达便能读取;否则,需要用户手动调用channel.read()。需要注意的是:当调用config.setAutoRead(boolean)方法时,如果状态由false变为true,将会调用channel.read()方法读取数据;由true变为false,将调用config.autoReadCleared()方法终止数据读取。
WRITE_BUFFER_HIGH_WATER_MARK
Netty参数,写高水位标记,默认值64KB。如果Netty的写缓冲区中的字节超过该值,Channel的isWritable()返回False。
WRITE_BUFFER_LOW_WATER_MARK
Netty参数,写低水位标记,默认值32KB。当Netty的写缓冲区中的字节超过高水位之后若下降到低水位,则Channel的isWritable()返回True。写高低水位标记使用户可以控制写入数据速度,从而实现流量控制。推荐做法是:每次调用channl.write(msg)方法首先调用channel.isWritable()判断是否可写。
MESSAGE_SIZE_ESTIMATOR
Netty参数,消息大小估算器,默认为DefaultMessageSizeEstimator.DEFAULT。估算ByteBuf、ByteBufHolder和FileRegion的大小,其中ByteBuf和ByteBufHolder为实际大小,FileRegion估算值为0。该值估算的字节数在计算水位时使用,FileRegion为0可知FileRegion不影响高低水位。
SINGLE_EVENTEXECUTOR_PER_GROUP
Netty参数,单线程执行ChannelPipeline中的事件,默认值为True。该值控制执行ChannelPipeline中执行ChannelHandler的线程。如果为Trye,整个pipeline由一个线程执行,这样不需要进行线程切换以及线程同步,是Netty4的推荐做法;如果为False,ChannelHandler中的处理过程会由Group中的不同线程执行。
(2)SocketChannel参数
SO_RCVBUF
Socket参数,TCP数据接收缓冲区大小。该缓冲区即TCP接收滑动窗口,linux操作系统可使用命令:cat /proc/sys/net/ipv4/tcp_rmem查询其大小。一般情况下,该值可由用户在任意时刻设置,但当设置值超过64KB时,需要在连接到远端之前设置。
SO_SNDBUF
Socket参数,TCP数据发送缓冲区大小。该缓冲区即TCP发送滑动窗口,linux操作系统可使用命令:cat /proc/sys/net/ipv4/tcp_smem查询其大小。
TCP_NODELAY
TCP参数,立即发送数据,默认值为Ture(Netty默认为True而操作系统默认为False)。该值设置Nagle算法的启用,改算法将小的碎片数据连接成更大的报文来最小化所发送的报文的数量,如果需要发送一些较小的报文,则需要禁用该算法。Netty默认禁用该算法,从而最小化报文传输延时。
SO_KEEPALIVE
Socket参数,连接保活,默认值为False。启用该功能时,TCP会主动探测空闲连接的有效性。可以将此功能视为TCP的心跳机制,需要注意的是:默认的心跳间隔是7200s即2小时。Netty默认关闭该功能。
SO_REUSEADDR
Socket参数,地址复用,默认值False。有四种情况可以使用:
(1)当有一个有相同本地地址和端口的socket1处于TIME_WAIT状态时,而你希望启动的程序的socket2要占用该地址和端口,比如重启服务且保持先前端口。
(2)有多块网卡或用IP Alias技术的机器在同一端口启动多个进程,但每个进程绑定的本地IP地址不能相同。
(3)单个进程绑定相同的端口到多个socket上,但每个socket绑定的ip地址不同。
(4)完全相同的地址和端口的重复绑定。但这只用于UDP的多播,不用于TCP。
SO_LINGER
Socket参数,关闭Socket的延迟时间,默认值为-1,表示禁用该功能。-1表示socket.close()方法立即返回,但OS底层会将发送缓冲区全部发送到对端。0表示socket.close()方法立即返回,OS放弃发送缓冲区的数据直接向对端发送RST包,对端收到复位错误。非0整数值表示调用socket.close()方法的线程被阻塞直到延迟时间到或发送缓冲区中的数据发送完毕,若超时,则对端会收到复位错误。
IP_TOS
IP参数,设置IP头部的Type-of-Service字段,用于描述IP包的优先级和QoS选项。
ALLOW_HALF_CLOSURE
Netty参数,一个连接的远端关闭时本地端是否关闭,默认值为False。值为False时,连接自动关闭;为True时,触发ChannelInboundHandler的userEventTriggered()方法,事件为ChannelInputShutdownEvent。
(3)ServerSocketChannel参数
SO_RCVBUF
已说明,需要注意的是:当设置值超过64KB时,需要在绑定到本地端口前设置。该值设置的是由ServerSocketChannel使用accept接受的SocketChannel的接收缓冲区。
SO_REUSEADDR
Socket参数,地址复用,默认值False。有四种情况可以使用:
(1)当有一个有相同本地地址和端口的socket1处于TIME_WAIT状态时,而你希望启动的程序的socket2要占用该地址和端口,比如重启服务且保持先前端口。
(2)有多块网卡或用IP Alias技术的机器在同一端口启动多个进程,但每个进程绑定的本地IP地址不能相同。
(3)单个进程绑定相同的端口到多个socket上,但每个socket绑定的ip地址不同。
(4)完全相同的地址和端口的重复绑定。但这只用于UDP的多播,不用于TCP。
SO_BACKLOG
Socket参数,服务端接受连接的队列长度,如果队列已满,客户端连接将被拒绝。默认值,Windows为200,其他为128。
(4)DatagramChannel参数
SO_BROADCAST
Socket参数,设置广播模式。
SO_RCVBUF
已说明
SO_SNDBUF
已说明
SO_REUSEADDR
已说明
IP_MULTICAST_LOOP_DISABLED
对应IP参数IP_MULTICAST_LOOP,设置本地回环接口的多播功能。由于IP_MULTICAST_LOOP返回True表示关闭,所以Netty加上后缀_DISABLED防止歧义。
IP_MULTICAST_ADDR
对应IP参数IP_MULTICAST_IF,设置对应地址的网卡为多播模式。
IP_MULTICAST_IF
对应IP参数IP_MULTICAST_IF2,同上但支持IPV6。
IP_MULTICAST_TTL
IP参数,多播数据报的time-to-live即存活跳数。
IP_TOS
已说明
DATAGRAM_CHANNEL_ACTIVE_ON_REGISTRATION
Netty参数,DatagramChannel注册的EventLoop即表示已激活。
五、RPC远程调用案例
在聊天室的案例基础上添加的功能
1、请求消息
想要远程调用一个方法,必须知道以下五个信息
- 方法所在的全限定类名
- 方法名
- 方法返回值类型
- 方法参数类型
- 方法参数值
public class RpcRequestMessage extends Message {
    /**
     * 调用的接口全限定名,服务端根据它找到实现
     */
    private String interfaceName;

    /**
     * 调用接口中的方法名
     */
    private String methodName;

    /**
     * 方法返回类型
     */
    private Class<?> returnType;

    /**
     * 方法参数类型数组
     */
    private Class[] parameterTypes;

    /**
     * 方法参数值数组
     */
    private Object[] parameterValue;

    public RpcRequestMessage(int sequenceId, String interfaceName, String methodName, Class<?> returnType, Class[] parameterTypes, Object[] parameterValue) {
        super.setSequenceId(sequenceId);
        this.interfaceName = interfaceName;
        this.methodName = methodName;
        this.returnType = returnType;
        this.parameterTypes = parameterTypes;
        this.parameterValue = parameterValue;
    }

    @Override
    public int getMessageType() {
        return RPC_MESSAGE_TYPE_REQUEST;
    }

     public String getInterfaceName() {
        return interfaceName;
    }

    public String getMethodName() {
        return methodName;
    }

    public Class<?> getReturnType() {
        return returnType;
    }

    public Class[] getParameterTypes() {
        return parameterTypes;
    }

    public Object[] getParameterValue() {
        return parameterValue;
    }

    @Override
    public String toString() {
        return "RpcRequestMessage{" +
                "interfaceName='" + interfaceName + '\'' +
                ", methodName='" + methodName + '\'' +
                ", returnType=" + returnType +
                ", parameterTypes=" + Arrays.toString(parameterTypes) +
                ", parameterValue=" + Arrays.toString(parameterValue) +
                '}';
    }
}
2、响应消息
public class RpcResponseMessage extends Message {
    /**
     * 返回值
     */
    private Object returnValue;
    /**
     * 异常值
     */
    private Exception exceptionValue;

    @Override
    public int getMessageType() {
        return RPC_MESSAGE_TYPE_RESPONSE;
    }


    public void setReturnValue(Object returnValue) {
        this.returnValue = returnValue;
    }

    public void setExceptionValue(Exception exceptionValue) {
        this.exceptionValue = exceptionValue;
    }

     public Object getReturnValue() {
        return returnValue;
    }

    public Exception getExceptionValue() {
        return exceptionValue;
    }

    @Override
    public String toString() {
        return "RpcResponseMessage{" +
                "returnValue=" + returnValue +
                ", exceptionValue=" + exceptionValue +
                '}';
    }
}
3、服务端处理器
远程调用方法主要是通过反射实现的,大致步骤如下
- 通过请求消息传入被调入方法的各个参数
- 通过全限定接口名,在map中查询到对应的类并实例化对象
- 通过反射获取Method,并调用其invoke方法的返回值,并放入响应消息中
- 若有异常需要捕获,并放入响应消息中
@ChannelHandler.Sharable
public class RpcRequestMessageHandler extends SimpleChannelInboundHandler<RpcRequestMessage> {
    @Override
    protected void channelRead0(ChannelHandlerContext ctx, RpcRequestMessage rpcMessage) {
        RpcResponseMessage rpcResponseMessage = new RpcResponseMessage();
        try {
            // 设置返回值的属性
            rpcResponseMessage.setSequenceId(rpcMessage.getSequenceId());
            // 获取实例,如果是spring项目,可以从容器中获取
            HelloService service = (HelloService) ServicesFactory.getInstance(Class.forName(rpcMessage.getInterfaceName()));

            // 通过反射调用方法,并获取返回值
            Method method = service.getClass().getMethod(rpcMessage.getMethodName(), rpcMessage.getParameterTypes());
            // 获得返回值
            Object invoke = method.invoke(service, rpcMessage.getParameterValue());
            // 设置返回值
            rpcResponseMessage.setReturnValue(invoke);
        } catch (Exception e) {
            e.printStackTrace();
            // 设置异常
            rpcResponseMessage.setExceptionValue(e);
        }
    }
    // 向channel中写入Message
    ctx.writeAndFlush(rpcResponseMessage);
}
返回一个实例
public class ServicesFactory {
    static HashMap<Class<?>, Object> map = new HashMap<>(16);

    public static Object getInstance(Class<?> interfaceClass) throws ClassNotFoundException, IllegalAccessException, InstantiationException {
        // 根据Class创建实例
        try {
            Class<?> clazz = Class.forName("cn.nyimac.study.day8.server.service.HelloService");
            Object instance = Class.forName("cn.nyimac.study.day8.server.service.HelloServiceImpl").newInstance();

            // 放入 InterfaceClass -> InstanceObject 的映射
            map.put(clazz, instance);
        } catch (ClassNotFoundException | InstantiationException | IllegalAccessException e) {
            e.printStackTrace();
        }
        return map.get(interfaceClass);
    }
}
4、服务器代码
public class RPCServer {
    public static void main(String[] args) {
        NioEventLoopGroup boss = new NioEventLoopGroup();
        NioEventLoopGroup worker = new NioEventLoopGroup();
        LoggingHandler loggingHandler = new LoggingHandler(LogLevel.DEBUG);
        MessageSharableCodec messageSharableCodec = new MessageSharableCodec();

        // PRC 请求消息处理器
        RpcRequestMessageHandler rpcRequestMessageHandler = new RpcRequestMessageHandler();
        try {
            ServerBootstrap serverBootstrap = new ServerBootstrap();
            serverBootstrap.channel(NioServerSocketChannel.class);
            serverBootstrap.group(boss, worker);
            serverBootstrap.childHandler(new ChannelInitializer<SocketChannel>() {
                @Override
                protected void initChannel(SocketChannel ch) throws Exception {
                    ch.pipeline().addLast(new ProtocolFrameDecoder());
                    ch.pipeline().addLast(loggingHandler);
                    ch.pipeline().addLast(messageSharableCodec);
                    ch.pipeline().addLast(rpcRequestMessageHandler);
                }
            });
            Channel channel = serverBootstrap.bind(8080).sync().channel();
            channel.closeFuture().sync();
        } catch (InterruptedException e) {
            e.printStackTrace();
        } finally {
            boss.shutdownGracefully();
            worker.shutdownGracefully();
        }
    }
}
5、客户端处理器
@ChannelHandler.Sharable
public class RpcResponseMessageHandler extends SimpleChannelInboundHandler<RpcResponseMessage> {
    static final Logger log = LoggerFactory.getLogger(ChatServer.class);

    @Override
    protected void channelRead0(ChannelHandlerContext ctx, RpcResponseMessage msg) throws Exception {
        log.debug("{}", msg);
        System.out.println((String)msg.getReturnValue());
    }
}
6、客户端
public class RPCClient {
    public static void main(String[] args) {
        NioEventLoopGroup group = new NioEventLoopGroup();
        LoggingHandler loggingHandler = new LoggingHandler(LogLevel.DEBUG);
        MessageSharableCodec messageSharableCodec = new MessageSharableCodec();

        // PRC 请求消息处理器
        RpcResponseMessageHandler rpcResponseMessageHandler = new RpcResponseMessageHandler();
        try {
            Bootstrap bootstrap = new Bootstrap();
            bootstrap.channel(NioSocketChannel.class);
            bootstrap.group(group);
            bootstrap.handler(new ChannelInitializer<SocketChannel>() {
                @Override
                protected void initChannel(SocketChannel ch) throws Exception {
                    ch.pipeline().addLast(new ProtocolFrameDecoder());
                    ch.pipeline().addLast(loggingHandler);
                    ch.pipeline().addLast(messageSharableCodec);
                    ch.pipeline().addLast(rpcResponseMessageHandler);
                }
            });
            Channel channel = bootstrap.connect(new InetSocketAddress("localhost", 8080)).sync().channel();
            channel.closeFuture().sync();
        } catch (InterruptedException e) {
            e.printStackTrace();
        } finally {
            group.shutdownGracefully();
        }
    }
}
7、客户端发送消息
public class RPCClient {
    public static void main(String[] args) {
        ...

        // 创建请求并发送
        RpcRequestMessage message = new RpcRequestMessage(1,
               "cn.nyimac.study.day8.server.service.HelloService",
               "sayHello",
               String.class,
               new Class[]{String.class},
               new Object[]{"Nyima"});

        channel.writeAndFlush(message);

        ...
    }
}
8、改进客户端
public class RPCClientManager {
    /**
     * 产生SequenceId
     */
    private static AtomicInteger sequenceId = new AtomicInteger(0);
    private static volatile Channel channel = null;
    private static final Object lock = new Object();
    public static void main(String[] args) {
        // 创建代理对象
        HelloService service = (HelloService) getProxy(HelloService.class);
        // 通过代理对象执行方法
        System.out.println(service.sayHello("Nyima"));
        System.out.println(service.sayHello("Hulu"));
    }

    /**
     * 单例模式创建Channel
     */
    public static Channel getChannel() {
        if (channel == null) {
            synchronized (lock) {
                if (channel == null) {
                    init();
                }
            }
        }
        return channel;
    }

    /**
     * 使用代理模式,帮助我们创建请求消息并发送
     */
    public static Object getProxy(Class<?> serviceClass) {
        Class<?>[] classes = new Class<?>[]{serviceClass};
        // 使用JDK代理,创建代理对象
        Object o = Proxy.newProxyInstance(serviceClass.getClassLoader(), classes, new InvocationHandler() {
            @Override
            public Object invoke(Object proxy, Method method, Object[] args) throws Throwable {
                // 创建请求消息
                int id = sequenceId.getAndIncrement();
                RpcRequestMessage message = new RpcRequestMessage(id, serviceClass.getName(),
                        method.getName(), method.getReturnType(),
                        method.getParameterTypes(),
                        args);
                // 发送消息
                getChannel().writeAndFlush(message);

                // 创建Promise,用于获取NIO线程中的返回结果,获取的过程是异步的
                DefaultPromise<Object> promise = new DefaultPromise<>(getChannel().eventLoop());
                // 将Promise放入Map中
                RpcResponseMessageHandler.promiseMap.put(id, promise);
                // 等待被放入Promise中结果
                promise.await();
                if (promise.isSuccess()) {
                    // 调用方法成功,返回方法执行结果
                    return promise.getNow();
                } else {
                    // 调用方法失败,抛出异常
                    throw new RuntimeException(promise.cause());
                }
            }
        });
        return o;
    }

    private static void init() {
        NioEventLoopGroup group = new NioEventLoopGroup();
        LoggingHandler loggingHandler = new LoggingHandler(LogLevel.DEBUG);
        MessageSharableCodec messageSharableCodec = new MessageSharableCodec();

        // PRC 请求消息处理器
        RpcResponseMessageHandler rpcResponseMessageHandler = new RpcResponseMessageHandler();

        Bootstrap bootstrap = new Bootstrap();
        bootstrap.channel(NioSocketChannel.class);
        bootstrap.group(group);
        bootstrap.handler(new ChannelInitializer<SocketChannel>() {
            @Override
            protected void initChannel(SocketChannel ch) throws Exception {
                ch.pipeline().addLast(new ProtocolFrameDecoder());
                ch.pipeline().addLast(loggingHandler);
                ch.pipeline().addLast(messageSharableCodec);
                ch.pipeline().addLast(rpcResponseMessageHandler);
            }
        });
        try {
            channel = bootstrap.connect(new InetSocketAddress("localhost", 8080)).sync().channel();
            // 异步关闭 group,避免Channel被阻塞
            channel.closeFuture().addListener(future -> {
                group.shutdownGracefully();
            });
        } catch (InterruptedException e) {
            e.printStackTrace();
        }
    }
}
获得Channel
- 建立连接,获取Channel的操作被封装到了
init方法中,当连接断开时,通过addListener方法异步关闭group - 通过单例模式创建与获取Channel
远程调用方法
- 为了让方法的调用变得简洁明了,将
RpcRequestMessage的创建与发送过程通过JDK的动态代理来完成 - 通过返回的代理对象调用方法即可,方法参数为被调用方法接口的Class类
远程调用方法返回值获取
调用方法的是主线程,处理返回结果的是NIO线程(RpcResponseMessageHandler)。要在不同线程中进行返回值的传递,需要用到Promise
在
RpcResponseMessageHandler中创建一个Map- Key为SequenceId
- Value为对应的Promise
主线程的代理类将RpcResponseMessage发送给服务器后,需要创建Promise对象,并将其放入到RpcResponseMessageHandler的Map中。需要使用await等待结果被放入Promise中。获取结果后,根据结果类型(判断是否成功)来返回结果或抛出异常
// 创建Promise,用于获取NIO线程中的返回结果,获取的过程是异步的 DefaultPromise<Object> promise = new DefaultPromise<>(getChannel().eventLoop()); // 将Promise放入Map中 RpcResponseMessageHandler.promiseMap.put(id, promise); // 等待被放入Promise中结果 promise.await(); if (promise.isSuccess()) { // 调用方法成功,返回方法执行结果 return promise.getNow(); } else { // 调用方法失败,抛出异常 throw new RuntimeException(promise.cause()); }NIO线程负责通过SequenceId获取并移除(remove)对应的Promise,然后根据RpcResponseMessage中的结果,向Promise中放入不同的值
- 如果没有异常信息(ExceptionValue),就调用
promise.setSuccess(returnValue)放入方法返回值 - 如果有异常信息,就调用
promise.setFailure(exception)放入异常信息
// 将返回结果放入对应的Promise中,并移除Map中的Promise Promise<Object> promise = promiseMap.remove(msg.getSequenceId()); Object returnValue = msg.getReturnValue(); Exception exception = msg.getExceptionValue(); if (promise != null) { if (exception != null) { // 返回结果中有异常信息 promise.setFailure(exception); } else { // 方法正常执行,没有异常 promise.setSuccess(returnValue); } }- 如果没有异常信息(ExceptionValue),就调用
9、改进客户端处理器
@ChannelHandler.Sharable
public class RpcResponseMessageHandler extends SimpleChannelInboundHandler<RpcResponseMessage> {
    static final Logger log = LoggerFactory.getLogger(ChatServer.class);

    /**
     * 用于存放Promise的集合,Promise用于主线程与NIO线程之间传递返回值
     */
    public static Map<Integer, Promise<Object>> promiseMap = new ConcurrentHashMap<>(16);

    @Override
    protected void channelRead0(ChannelHandlerContext ctx, RpcResponseMessage msg) throws Exception {
        // 将返回结果放入对应的Promise中,并移除Map中的Promise
        Promise<Object> promise = promiseMap.remove(msg.getSequenceId());
        Object returnValue = msg.getReturnValue();
        Exception exception = msg.getExceptionValue();
        if (promise != null) {
            if (exception != null) {
                // 返回结果中有异常信息
                promise.setFailure(exception);
            } else {
                // 方法正常执行,没有异常
                promise.setSuccess(returnValue);
            }
        }
        // 拿到返回结果并打印
        log.debug("{}", msg);
    }
}
